Hosting a sewing and DIY fashion class in your gazebo is a fantastic idea! First, pick a date when the weather’s nice and check your guests’ availability. Gather a variety of fabrics and essential tools to guarantee everyone has what they need. Design a flexible curriculum that caters to all skill levels. Create a welcoming atmosphere with colorful décor and comfy seating. And don’t forget to promote your class creatively to attract participants. There’s so much more to explore!
Choosing the Right Date and Time
When’s the best time to host your sewing and DIY fashion class? It really depends on a couple of key factors: weather considerations and guest availability. If you’re thinking of a lovely outdoor setting, like your gazebo, aim for spring or early fall when the weather’s mild. You wouldn’t want your sewing creations blown away by a sudden gust of wind! Additionally, ensure your gazebo is durable and weather-resistant to provide a comfortable and stable environment for your class.
Next, check in with your potential guests. Evenings or weekends usually work best, but make sure to send out a quick poll to gauge their schedules. You want everyone to feel free to join in and express their creativity. With the right timing, you’re not just hosting a class; you’re creating a fun community experience!
Essential Supplies and Equipment
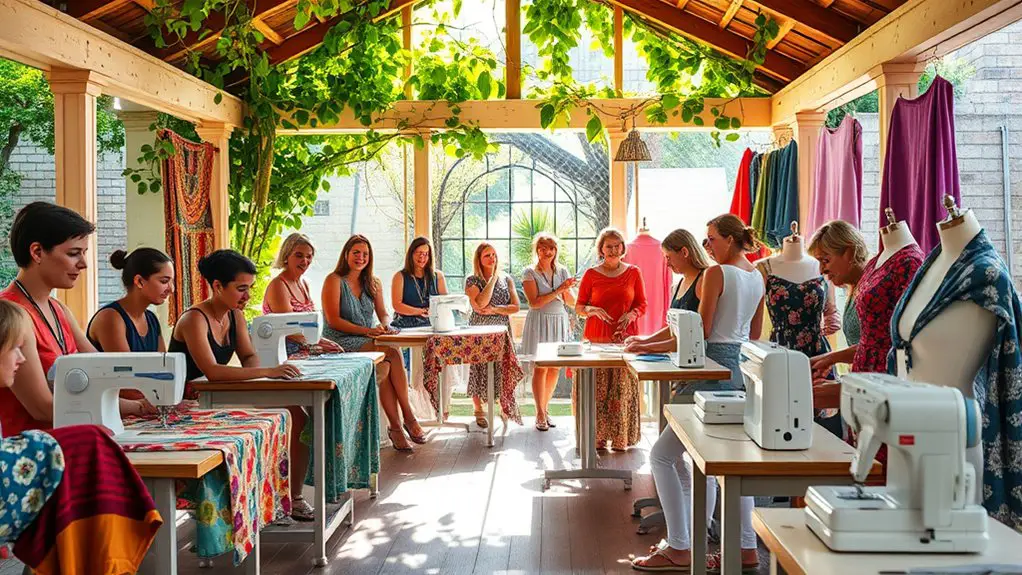
Now that you’ve picked the perfect date and time for your sewing and DIY fashion class, it’s time to gather the supplies and equipment you’ll need. Start by selecting a variety of fabric types—cotton, linen, or stretchy jersey—so everyone can explore their creativity. Next, you’ll want a solid set of sewing tools, including scissors, pins, and measuring tapes. Don’t forget sewing machines if you’ll be working on more complex projects! A few cutting mats and rotary cutters can also make life easier. Finally, consider having labels and markers on hand for organization. With these essentials, you’ll create an inspiring environment where everyone can release their inner fashion designer. Let the creativity flow!
Designing the Class Curriculum
As you start to craft the curriculum for your sewing and DIY fashion class, it’s essential to take into account the skill levels and interests of your participants. Begin by setting clear curriculum objectives; this way, you’ll guarantee everyone knows what they’re working towards. Think about incorporating a mix of foundational techniques for beginners, while offering advanced projects for those with more experience. You might include topics like pattern making, fabric selection, and upcycling, which can ignite creativity and freedom in expression. Don’t forget to leave room for individual projects, allowing your students to explore their unique styles. By creating a flexible curriculum, you’ll foster a fun and engaging environment where everyone can thrive and grow.
Creating a Welcoming Atmosphere
Creating a welcoming atmosphere in your sewing and DIY fashion class can make all the difference in how students feel about participating. Start with inviting decor that reflects creativity and warmth. Think colorful fabric swatches, inspirational quotes, and maybe even some handmade pieces on display. This not only engages your students but also sparks their creativity.
Don’t forget about comfortable seating! Providing cozy chairs or cushions encourages relaxation and makes your gazebo feel like a true creative space. Arrange seating in a circle or semi-circle to foster conversation and collaboration. Remember, the more at ease your students feel, the more they’ll be willing to share ideas and explore their skills. This inviting environment sets the stage for a fun and productive class experience! Additionally, incorporating outdoor lighting can enhance the atmosphere, making it feel even more inviting during evening sessions.
Promoting Your Sewing Class
How can you effectively promote your sewing class to attract enthusiastic participants? It’s all about connecting with your community and using the right channels. Here are three strategies to get you started:
- Leverage Social Media: Post engaging content showcasing your sewing projects, class details, and testimonials. Use platforms like Instagram and Facebook to reach potential students.
- Build Local Partnerships: Collaborate with nearby fabric stores or craft shops. They can help you spread the word and even host flyers or events.
- Host a Free Introductory Session: Offer a sneak peek into your class. This gives people a taste of what they’ll learn, making them more likely to sign up.
Get creative, and let your passion for sewing shine through!
Frequently Asked Questions
What Is the Ideal Number of Participants for the Class?
For the ideal class size, you’d want around six to eight participants. This encourages meaningful interaction and keeps everyone engaged. Smaller groups often foster creativity and allow for personalized attention, making the experience more enjoyable.
Can I Offer Refreshments During the Class?
Sure, you can totally offer refreshments during the class! Just think of some fun refreshment options that cater to everyone’s tastes and dietary considerations. It’ll keep the atmosphere lively and everyone engaged. Enjoy the freedom!
How Do I Handle Cancellations or Refunds?
When handling cancellations, it’s important to have a clear cancellation policy. If someone requests a refund, make certain they’re aware of your refund process. Keeping it straightforward helps maintain trust and respect between you and your participants.
What Should I Do in Case of Bad Weather?
When storm clouds gather, don’t fret! Have an alternative venue in mind as your rain plan. Whether it’s indoors or under a sturdy shelter, keep the creativity flowing and your spirits bright, no matter the weather!
Do I Need to Provide Individual Sewing Machines?
You don’t have to provide individual sewing machines. Consider supply options like renting machines through rental agreements. This way, you can offer flexibility without overwhelming yourself. Plus, it keeps the class fun and accessible!