To host a landscape photography session in your gazebo, pick the golden hour for stunning light that brings warmth and depth to your images. Clear debris from the gazebo and position it near vibrant natural features. Use manual camera settings, with a lower ISO and ideal aperture for sharpness. Frame your shots using surrounding foliage, and trust your instincts. With thoughtful composition and engaging with nature, you can capture breathtaking scenes that tell intriguing stories. Discover more tips to elevate your experience.
Choosing the Right Time of Day for Optimal Lighting
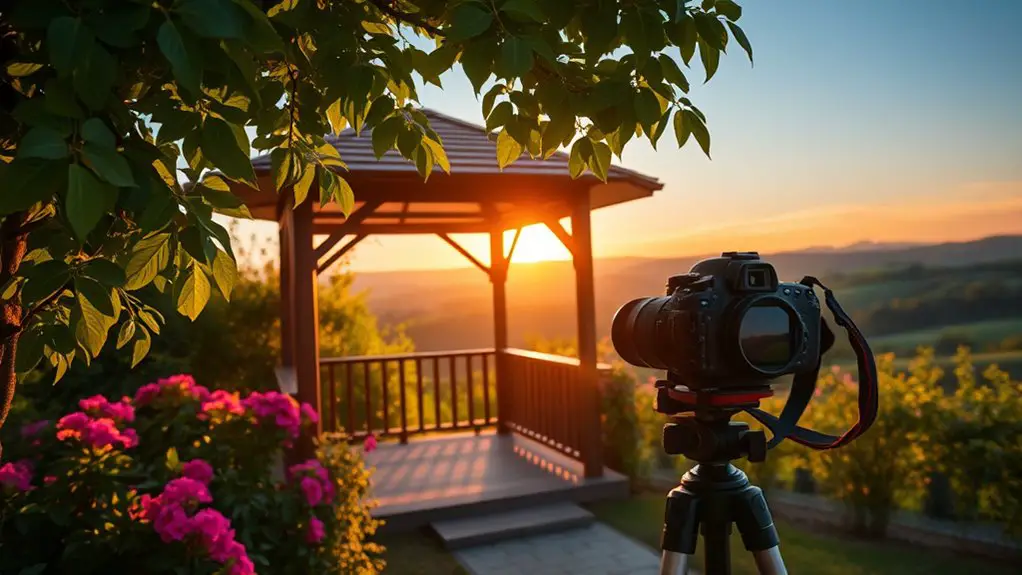
When’s the best time to capture the landscape’s true essence? You’ll find it during the golden hour, that magical period just after sunrise or before sunset. The lighting conditions transform your surroundings into a vivid canvas, drenching everything in rich, warm hues. Shadows elongate, creating depth and drama that breathe life into your compositions. As the sun dips below the horizon, the sky ignites with a palette of oranges, pinks, and purples, inviting you to frame breathtaking scenes. You’ll feel a sense of freedom, knowing this fleeting moment offers unparalleled beauty. So, grab your camera and venture outdoors, embracing the enchanting light that dances through the air, revealing the landscape in a way you’ve never seen before.
Preparing Your Gazebo for the Perfect Shot
As you prepare your gazebo for the perfect shot, consider how its structure interacts with the surrounding landscape. Begin with a bit of gazebo maintenance; clear away any debris or clutter that might distract from your image. Next, think about ideal positioning—align the gazebo with the best natural features, like a vibrant flower bed or a serene pond. Use the gazebo’s architectural elements to frame the landscape, creating depth and interest in your photos. Adjust the seating or decorations to enhance visual appeal without overwhelming the scene. Remember, the goal is to create a harmonious blend between the gazebo and nature, allowing your creativity to flow freely as you capture stunning photographs. Additionally, consider how sun and shade exposure can affect the lighting in your shots for optimal results.
Selecting the Best Camera Settings
To capture the breathtaking beauty of a landscape, selecting the right camera settings is essential, ensuring your vision translates perfectly onto the digital canvas. Start by choosing the appropriate camera modes; manual mode gives you the freedom to control aperture, shutter speed, and ISO for ideal exposure settings. Aim for a lower ISO (100-200) to minimize noise, while adjusting your aperture between f/8 and f/16 for sharp depth of field. Set a slower shutter speed to allow more light in during golden hours. Remember to use a tripod to stabilize your shots, especially in low light. Experiment with these settings, trusting your intuition and creativity, and watch as the vibrant hues of nature come alive in your photographs.
Utilizing Surrounding Nature for Enhanced Composition
As you frame your shot, let the surrounding foliage act as a natural border, guiding the viewer’s eye to your focal point. Pay attention to the quality of light—soft morning rays or golden hour hues can transform an ordinary scene into something magical. By weaving these elements together, you’ll create a composition that resonates with depth and emotion. Additionally, consider incorporating outdoor lighting options to enhance the ambiance of your gazebo during the session.
Framing With Foliage
While exploring the beauty of nature, you can transform your landscape photographs by framing your subject with foliage. Using various framing techniques allows you to create depth and draw attention to your focal point. Consider the textures of foliage around you; they can add richness and contrast to your composition, enhancing the visual appeal of your images.
| Framing Technique | Foliage Texture | Effect |
|---|---|---|
| Overhead Canopy | Lush Green Leaves | Creates a soft glow |
| Side Framing | Twisting Vines | Adds dynamic movement |
| Foreground Elements | Colorful Blooms | Introduces vibrant layers |
Incorporating Natural Light
Natural light can dramatically transform your landscape photography, enhancing both mood and depth. To harness this power, consider the time of day; golden hour offers soft, warm light quality that paints your subjects beautifully. Experiment with natural light techniques by positioning your subjects in the shade of trees or allowing dappled sunlight to create interesting patterns. Pay attention to how shadows interact with your composition, adding layers and dimension. Don’t shy away from cloudy days either; diffused light can bring out rich colors and details, providing a serene atmosphere. Trust your instincts and let the surrounding nature guide your shots, embracing the freedom of capturing life in its purest form. Let the light dictate your artistry.
Incorporating Unique Angles and Perspectives
How can you elevate your landscape photography by playing with angles and perspectives? Embracing creative angles and perspective shifts can transform your images into enchanting stories. Here are three techniques to inspire your shots:
- Low to High: Get low to the ground, capturing the foreground while allowing the sky to dominate. This adds depth and drama.
- Diagonal Composition: Frame your subject diagonally to create a sense of movement and guide the viewer’s eye through the scene.
- Framing Elements: Use natural elements like branches or flowers to frame your subject, drawing attention and adding layers to your composition.
Experimenting With Different Lenses
Exploring unique angles and perspectives can greatly enhance your landscape photography, but the choice of lens is just as essential in shaping the narrative of your images. Different lens types offer distinct capabilities—wide-angle lenses can capture sweeping vistas, while telephoto lenses compress space, drawing distant elements closer. Experimenting with varying focal lengths can transform your compositions; a 24mm lens allows for expansive scenes, while a 70-200mm lens invites intimacy with details. Don’t shy away from mixing these lenses to craft a story that resonates. As you frame your shots in the gazebo, let your creativity flow—each lens can reveal new dimensions, inviting you to discover the beauty hidden in the ordinary. Embrace the possibilities!
Adding Props and Elements to Your Scene
While the landscape itself often tells a compelling story, incorporating props and elements can elevate your photography to new heights. Thoughtful props selection enhances the scene, adding layers that draw viewers in. Here are three ideas to contemplate:
- Natural Textures: Use stones, driftwood, or leaves to complement the landscape’s organic beauty.
- Human Elements: A vintage chair or a rustic table can juxtapose nature’s grandeur, inviting the viewer’s imagination.
- Colorful Fabrics: A vibrant blanket or scarf can provide a splash of color, creating a stunning contrast against the greenery.
Post-Processing Techniques for Stunning Results
Incorporating props can certainly enhance your landscape photography, but the magic often happens in post-processing, where you can refine the story your image tells. Start with color correction to breathe life into your scene; tweak saturation and contrast to make those hues pop. Don’t shy away from experimenting—each adjustment is a chance to express your vision. Next, focus on texture enhancement; this can add depth and dimension, drawing viewers into the landscape. Use tools like sharpening and clarity sliders to emphasize the intricate details of your subjects. Ultimately, post-processing is your playground, where you can transform a good shot into a stunning masterpiece. Trust your instincts and let your creativity flourish in the editing phase.
Showcasing Your Work and Sharing Your Experience
As you prepare to showcase your landscape photography, consider how the perfect backdrop can amplify your images, drawing viewers into your vision. Engaging with visitors during the display not only enhances their experience but also creates a dialogue that enriches your craft. A gazebo can serve as an elegant venue, providing shade and shelter, which allows for comfortable viewing and interaction regardless of weather conditions. Finally, displaying your final results with thoughtful arrangement elevates both the artwork and the storytelling behind each shot.
Selecting Perfect Backdrops
Selecting the perfect backdrop for your landscape photography session can elevate your work from ordinary to extraordinary, especially when you consider how natural elements interact with light and composition. Pay attention to backdrop colors and natural textures that can add depth to your shots.
- Golden Hour Glow – Capture those magical moments when the sun bathes your gazebo in warm hues, enhancing your images with stunning light.
- Lush Greenery – Use vibrant foliage as a natural frame, creating a rich tapestry that complements your subject beautifully.
- Textured Surfaces – Incorporate elements like weathered wood or stone to add dimension, providing contrast against softer background elements.
Engaging With Visitors
There’s something magical about sharing your landscape photography journey with others. As you invite visitors to your gazebo, create an atmosphere ripe for engaging storytelling. Use your photographs as a canvas, illustrating the tales behind each shot—the whispering winds, the vibrant colors of dawn, or the tranquil silence of dusk. Encourage visitor interactions by asking them about their favorite pieces, their own experiences, or what inspires them in the natural world. Respond with passion, weaving your insights and techniques into the conversation. Showcase the technical aspects of your work, like composition and lighting, while inviting them to explore their creativity. This connection fosters a sense of freedom, allowing everyone to appreciate the beauty surrounding them while sharing a moment of artistic camaraderie.
Displaying Final Results
When you finally reveal your landscape photographs, the anticipation in the air is palpable, as if each image holds a secret waiting to be shared. Your final presentation should evoke emotion and showcase your artistic vision. Consider exploring these print options:
- Canvas Prints: Transform your images into textured masterpieces, perfect for adding depth to any space.
- Metal Prints: Offer a modern touch, reflecting light and color vibrantly, making your landscapes pop.
- Framed Prints: Elevate your work with elegant framing, providing a classic feel that complements your artistic statement.
Frequently Asked Questions
What Types of Props Work Best for Landscape Photography in a Gazebo?
For landscape photography in a gazebo, consider using natural elements like flowers and foliage, paired with decorative accents such as lanterns or colorful cushions. These additions enhance visual interest and create a harmonious, inviting atmosphere.
How Can I Attract Wildlife to My Gazebo for Photography?
To attract wildlife, set up bird feeders and a small water source near your gazebo. You’ll create a vibrant scene, inviting colorful birds and creatures, allowing you to capture nature’s beauty through your lens.
Is It Necessary to Use a Tripod for Gazebo Photography?
Using a tripod isn’t strictly necessary, but it offers significant advantages. You’ll experience enhanced camera stability, resulting in sharper images. Embrace the freedom to explore various angles without compromising quality; it’s a photographer’s secret weapon.
What Clothing Should I Wear for a Photography Session in My Gazebo?
Wondering what to wear? For your photography session, choose comfortable attire that harmonizes with your surroundings. Think color coordination—earthy tones or vibrant hues can elevate the scene, giving your shots that artistic flair.
How Do I Find Inspiration for Landscape Shots in My Gazebo?
To find inspiration, observe nature themes around you. Notice seasonal changes—flowers blooming, leaves turning. Experiment with angles and light. Let your gazebo frame the beauty, capturing the essence of each moment, and embrace your artistic freedom.