To set up your gazebo for macro photography sessions, start by choosing a well-lit location that offers interesting backgrounds while avoiding harsh winds. Select a gazebo that fits your style and provides enough space for flexibility. Prepare the ground for stability and guarantee your setup is secure. Use diffusers for soft lighting and reflectors to eliminate shadows. Organize your gear for easy access, and create a controlled environment to capture stunning detail. Discover more tips to enhance your session!
Choosing the Right Location for Your Gazebo
When it comes to setting up your gazebo for macro photography, choosing the right location is essential for capturing stunning images. Start by considering gazebo placement; find a spot that offers both natural light and intriguing backgrounds. Look for areas with diverse flora and textures, as they can add depth to your shots. Additionally, think about environmental considerations—avoid spots where harsh winds or direct sunlight could disrupt your setup. A shaded area might be ideal, allowing for softer lighting and reduced glare. Also, consider the proximity to your subjects; you want to be close enough to capture intricate details, yet far enough to avoid disturbing the local wildlife. With the right location, your macro photography can truly flourish. Furthermore, the orientation of the backyard can greatly affect sun exposure, so choose a position that maximizes natural light while minimizing harsh shadows.
Selecting the Ideal Gazebo Size and Style
Finding the perfect location for your gazebo sets the stage, but selecting the right size and style will elevate your macro photography experience even further. Consider what you want to capture; a spacious gazebo allows for flexibility in angle and lighting, while a more compact one can create an intimate setting. Explore various gazebo materials such as wood, metal, or fabric, each contributing to different aesthetics. A wooden gazebo might lend a rustic charm, while a sleek metal structure can provide a modern vibe. Choose aesthetic designs that resonate with your personal style and complement your surroundings. Remember, the right gazebo transforms your photography sessions, providing a beautiful backdrop while ensuring you have the freedom to explore your creative vision. Additionally, the selection of materials can greatly influence not only the appearance but also the durability and maintenance of your gazebo.
Preparing the Ground and Setting Up the Gazebo
Before you can plunge into the world of macro photography, it’s essential to prepare the ground and set up your gazebo properly. Start by choosing a level, well-drained area to guarantee your gazebo is stable. Remove any debris, rocks, or uneven patches that could disrupt your setup. If the ground’s soft, consider laying down a tarp or sturdy mat to enhance stability. Once the ground’s ready, assemble your gazebo according to the manufacturer’s instructions, guaranteeing each leg is securely locked in place. For added stability, weigh down the corners with sandbags or stakes if it’s breezy. This solid foundation not only supports your gazebo but also allows you to focus on capturing stunning close-up shots without worrying about your setup. Additionally, ensure that you follow safety measures to prevent accidents during the installation process.
Modifying Your Gazebo for Optimal Lighting
To capture stunning macro shots, you’ll want to modify your gazebo to maximize natural light. Consider using diffusers to soften harsh sunlight, creating a more even and flattering illumination for your subjects. Positioning your setup strategically can also help you take advantage of the best light throughout the day, enhancing your photography experience.
Use Diffusers Effectively
How can you transform harsh sunlight into a soft, inviting glow for your macro photography? By using effective diffuser materials, you can achieve stunning light diffusion that enhances your subjects. Consider lightweight options like sheer fabric, white bedsheets, or even professional diffusion panels. Position these materials between your light source and the subject to soften those glaring rays. You’ll be amazed at how much more vibrant your flowers or insects look when the light is diffused. Experiment with different materials to see which ones provide the best results for your unique setup. Don’t be afraid to get creative; after all, freedom in your approach leads to mesmerizing captures that truly reflect your artistic vision!
Position for Natural Light
While you’re setting up your gazebo for macro photography, paying attention to natural light can make a significant difference in your images. To capture those intricate details, position your gazebo in a way that allows soft, diffused light to filter through. Early mornings or late afternoons are ideal when the sun’s rays are gentle. Don’t forget about angle adjustments; even a slight shift can dramatically change how light interacts with your subjects. Experiment with different orientations to find the most flattering light for your close-ups. Remember, the right natural light not only enhances colors but also adds depth, making your macro shots come alive. Embrace this freedom to explore; after all, the perfect shot is just a setup away!
Creating a Stable Surface for Your Camera Equipment
A solid foundation is essential for capturing stunning macro shots, as even the slightest movement can blur your images. Ensuring tripod stability is key, so choose a stable surface within your gazebo. If the ground is uneven, consider using a sturdy mat or dedicated photography platform to create a level base. Smooth surface materials like wood or composite can enhance stability, allowing your tripod to anchor securely without slipping. If you’re working on grass or soil, stakes can provide additional support for your tripod legs. Remember, a well-placed, stable surface not only steadies your camera but also gives you the freedom to focus on your artistic vision, capturing intricate details in nature without distraction. Additionally, ensuring proper drainage is crucial to prevent water damage that could affect the stability of your setup.
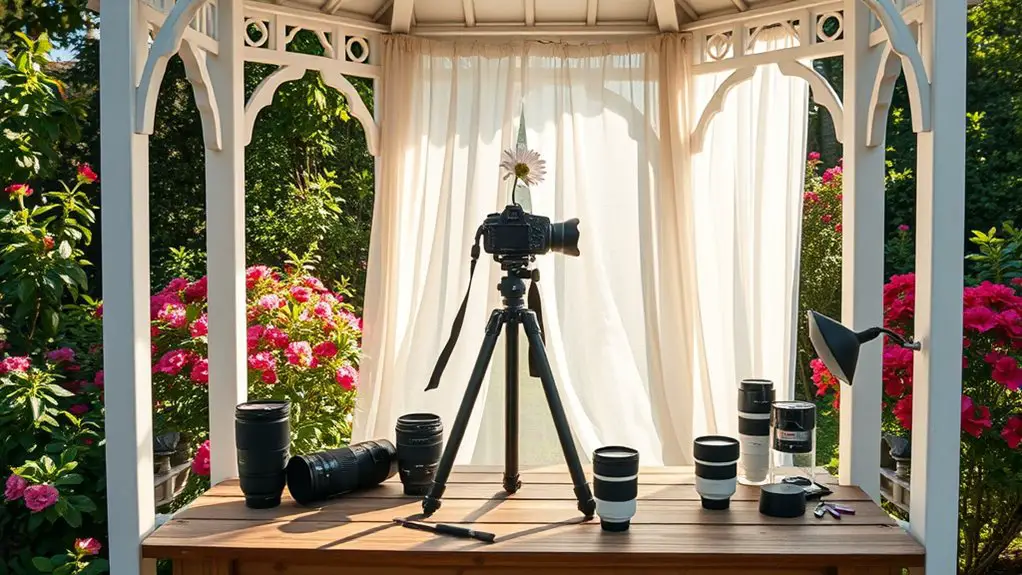
Organizing Your Photography Gear and Accessories
Before you start capturing those intricate details, it’s vital to get your gear organized. Make a checklist of essential equipment, explore storage solutions for your accessories, and consider portable lighting options to enhance your setup. With everything in its place, you’ll be ready to focus entirely on your photography.
Essential Gear Checklist
Creating stunning macro photographs requires more than just a keen eye; it demands the right gear to capture those intricate details. Start with a reliable camera that allows you to adjust essential camera settings like aperture, ISO, and shutter speed. A dedicated macro lens is vital for those close-up shots, enabling you to explore the smallest subjects. Don’t forget a sturdy tripod to eliminate shake and enhance stability, especially in low light. A remote shutter release can also help you avoid any vibrations when snapping the shot. Finally, consider supplemental lighting options, like LED panels or flash diffusers, to illuminate your subjects beautifully. With this essential gear checklist, you’re ready to plunge into exciting macro photography techniques that release your creativity!
Accessory Storage Solutions
Once you’ve gathered your photography gear, organizing it effectively becomes essential for a smooth shooting experience. Consider using storage bins to keep your lenses, filters, and other accessories sorted and easily accessible. Clear bins let you quickly see what you have, saving you time during those golden hour moments.
In addition, accessory racks can be a game-changer. They allow you to hang items like tripods, reflectors, and even your camera straps, keeping them tidy and within reach. By implementing these solutions, you’ll create a clutter-free workspace that fosters creativity. Embrace the freedom of having everything organized, so you can focus on capturing stunning macro shots without the stress of searching for gear.
Portable Lighting Options
When it comes to macro photography, having the right lighting can make all the difference, and portable lighting options provide versatility for capturing those intricate details. Consider using LED lights for bright, consistent illumination without the hassle of cords. Pair them with portable reflectors to bounce light where you need it most, enhancing your subject’s features beautifully. Battery packs are essential for keeping your setup mobile, so you won’t be tethered to an outlet. Additionally, softbox options can diffuse harsh light, creating a soft, even glow that flatters your subjects. With these tools in your arsenal, you can explore your creative freedom and adapt your lighting to any environment, ensuring stunning macro shots every time.
Tips for Maintaining a Controlled Environment
Maintaining a controlled environment in your gazebo can greatly enhance your macro photography results. Start by keeping an eye on the temperature; a comfortable range will help prevent condensation on your lens and subjects. Use a small fan or heater to assist with temperature regulation as needed. Next, focus on controlled humidity. Consider using a dehumidifier or a small humidifier to create the ideal conditions for your delicate subjects, like flowers or insects. It’s also wise to monitor the weather outside; a sudden change can disrupt your carefully crafted setup. By ensuring these elements are in check, you’ll have the freedom to capture stunning macro images without worry, allowing you to immerse yourself completely in the beauty around you.
Capturing Stunning Macro Shots Inside Your Gazebo
With the environment inside your gazebo perfectly controlled, you’re ready to turn your attention to capturing stunning macro shots. Start by selecting the right lens; a dedicated macro lens will provide you with sharp detail and the ability to focus closely on your subjects. Look for macro subjects like delicate flowers, intricate insects, or textured leaves, and don’t hesitate to experiment with angles and compositions. Pay attention to lighting—natural light streaming through the gazebo can create beautiful effects. Use reflectors to bounce light and eliminate harsh shadows. Remember to adjust your aperture for depth of field; a lower f-stop can make your subject pop against a softly blurred background. Embrace the freedom to explore and capture nature in intricate detail!
Frequently Asked Questions
What Type of Macro Lens Is Best for Gazebo Photography?
For gazebo photography, a macro lens with a focal length of 90-105mm is ideal. You’ll appreciate its sharpness and depth. Consider portrait lenses for beautiful bokeh or zoom lenses for versatility. Each offers unique creative freedom.
How Do I Avoid Reflections in My Macro Shots?
To avoid reflections in your macro shots, use reflection techniques like polarizing filters and adjust lighting to minimize glare. Experiment with angles and diffusers to achieve that perfect, freedom-filled shot you’re aiming for.
Can I Use Artificial Lighting in My Gazebo?
Absolutely, you can use artificial lighting in your gazebo setup! It enhances your macro shots by providing consistent illumination, reducing shadows, and allowing for creative effects. Experiment with different light sources to find what works best for you.
What Time of Day Is Best for Macro Photography?
For macro photography, the golden hour is ideal. The soft, warm natural light enhances details and colors in your subjects. You’ll capture stunning images with gentle shadows, giving your photos that enchanting, ethereal quality.
How Do I Clean My Camera Equipment After Outdoor Shoots?
Cleaning your camera’s components is essential. Carefully conduct lens maintenance and sensor cleaning, using a soft brush and microfiber cloth. Don’t underestimate the importance of protecting your precious gear after outdoor adventures; it deserves diligent care.