To organize a floral arrangement class under your gazebo, first pick an ideal date and time that considers weather and participant availability. Create an inviting atmosphere with decorations, seating in a circle, and enough space for movement. Develop an engaging curriculum with a blend of theory and hands-on practice. Market your class on social media and build community among attendees. Setting up a comfortable workspace will enhance creativity, and there’s so much more to discover when planning your event!
Choosing the Right Date and Time
When’s the best time to plunge into a floral arrangement class? Well, it really depends on a couple of key factors: considering weather and participant availability. If you want a vibrant, outdoor setting, aim for spring or early summer when flowers bloom in abundance. Just make certain to check the forecast—rainy days can dampen spirits and flowers alike.
Next, think about your participants’ schedules. Weekends often work best, allowing everyone to relax and fully immerse themselves in creativity. But don’t be afraid to experiment with weekday evenings; some people thrive on spontaneity and might appreciate a midweek floral escape.
Once you’ve settled on a date, send out invites early to guarantee everyone can join in the fun. Remember, the goal is to create an atmosphere that feels free and inviting, so choose a time that encourages relaxation and inspiration. Adding comfortable seating can enhance the experience for your guests and make the class even more enjoyable. Happy arranging!
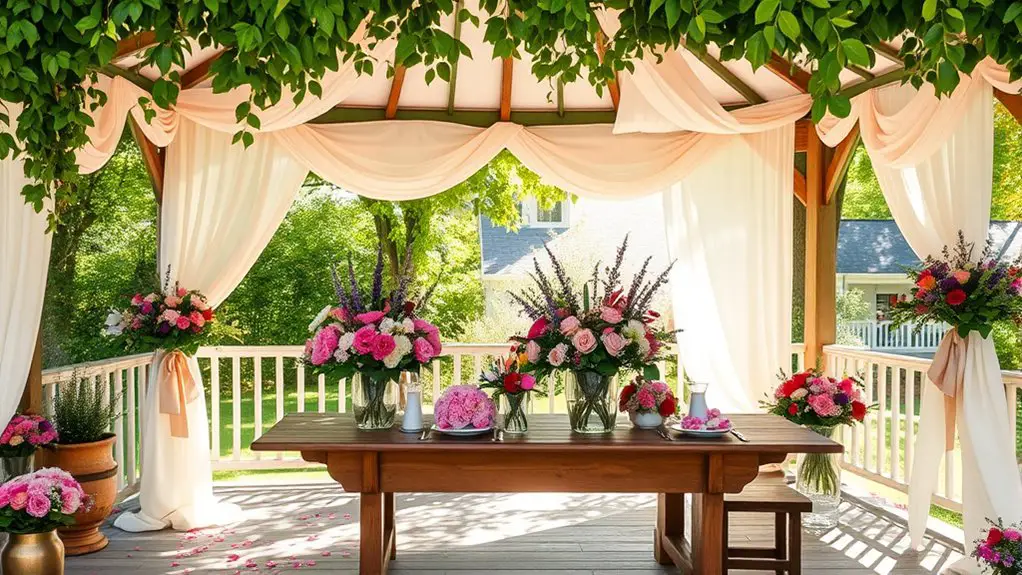
Preparing the Gazebo Environment
As you prepare the gazebo environment for your floral arrangement class, consider how the setting can inspire creativity and relaxation. Start by adding some charming gazebo decorations; think colorful banners, twinkling fairy lights, or even a tasteful floral backdrop. These elements will create an inviting atmosphere that sparks joy and imagination.
Next, keep weather considerations in mind. If you’re expecting sun, provide shade with umbrellas or canopies to keep everyone comfortable. Conversely, if rain is a possibility, have a backup plan ready with tarps or alternative indoor spaces. Additionally, incorporating outdoor fabric options can enhance the overall aesthetic and comfort of your setup.
Arrange seating in a circle to foster connection and encourage collaboration among participants. Make sure there’s enough space for everyone to move freely while working on their arrangements. With the right setup, your gazebo will become a haven for floral creativity, allowing your class to flourish amidst nature’s beauty.
Selecting Floral Materials and Tools
Selecting the right floral materials and tools can elevate your arrangements from simple to stunning. Start by choosing a variety of flower types that inspire you—think vibrant sunflowers, delicate roses, or fragrant lilies. Mix textures and colors to create visual interest and harmony. Don’t forget about foliage; greenery can add depth and contrast to your arrangements.
Next, gather essential tools. You’ll need sharp scissors or floral shears for clean cuts, a sturdy vase or container, and floral foam if you’re working with larger designs. Consider using wire and tape to secure your stems and create unique shapes.
Experiment with different arrangement techniques, like the spiral method or the grid technique, to find your style. Encourage your participants to explore their creativity and let their personalities shine through in their floral creations. With the right materials and tools, you’ll transform your gazebo into a floral haven!
Creating an Engaging Curriculum
With the right materials and tools in hand, it’s time to shape an engaging curriculum that captivates your participants. Start by defining your curriculum objectives—what do you want your students to achieve? Incorporate a mix of theory and hands-on activities to keep the energy flowing and creativity ignited.
Here’s a simple structure to contemplate:
| Class Component | Activity |
|---|---|
| Introduction | Discuss floral fundamentals |
| Hands-On Practice | Create a simple arrangement |
| Wrap-Up & Reflection | Share experiences and tips |
Encourage freedom of expression throughout the class. Let participants explore their unique styles while guiding them through essential techniques. By balancing structure with creative freedom, you’ll foster an enjoyable learning environment that leaves everyone excited to create their own beautiful floral masterpieces! Additionally, holding the class under a gazebo provides a shaded area that enhances outdoor comfort, allowing participants to focus on their creativity without distractions from the elements.
Promoting Your Floral Class
How can you attract the right participants to your floral arrangement class? Start by harnessing the power of social media. Create eye-catching posts showcasing your beautiful arrangements, behind-the-scenes clips, and testimonials from past participants. Engage your audience with polls or questions about their floral preferences.
Next, forge local partnerships with nearby businesses, like cafes or boutiques, to cross-promote your class. Offer to display your arrangements in their space, and in return, they can share your event on their platforms.
Don’t forget to host an enticing giveaway! A free spot in your class or a floral arrangement can spark interest and encourage sign-ups.
Lastly, consider creating a dedicated event page to keep potential participants informed about class details, dates, and what they can expect. With these strategies, you’ll cultivate a vibrant community enthusiastic to learn and create under your gazebo.
Setting Up a Comfortable Workspace
To create your floral masterpiece, you’ll want a workspace that feels just right. Start by arranging your seating for comfort and accessibility, allowing you to move freely as you craft. Don’t forget to brighten your space with ample lighting, so every petal shines as beautifully as your creativity!
Choose Ideal Seating Arrangement
Creating the perfect seating arrangement for your floral arrangement class can make all the difference in fostering creativity and comfort. Consider various seating options, like folding chairs or cushions, depending on the vibe you want to create. A circular layout style encourages interaction, letting everyone share ideas and inspiration. Alternatively, a U-shape can facilitate demonstrations while still allowing for engagement. Make certain that each participant has enough space to work on their arrangements without feeling cramped. Think about mobility too—easy access to supplies can spark creativity. Finally, don’t forget to arrange seating to face your centerpiece display, promoting focus and inspiration. Your thoughtfully chosen seating can transform the experience, making it enjoyable and productive for everyone!
Ensure Adequate Lighting
While you might think flowers are the star of the show, adequate lighting plays an essential role in setting up a comfortable workspace for your floral arrangement class. Harnessing natural light is ideal, so consider positioning your tables near the gazebo’s openings. If sunlight isn’t abundant, don’t fret; artificial lighting can create a warm and inviting atmosphere.
Here’s a quick guide:
| Lighting Type | Benefits |
|---|---|
| Natural Light | Enhances colors and textures |
| Artificial Lighting | Provides consistent brightness |
| Combination | Balances shadows and highlights |
| Dimmer Options | Allows for adjustable ambiance |
Following up With Participants
Although you might be enthusiastic to move on to your next project, taking the time to follow up with participants after a floral arrangement class can greatly enhance their experience and your reputation. Start by sending a friendly email thanking them for attending. This simple gesture shows you value their time and creativity.
Next, ask for post class feedback. A few well-crafted questions can help you understand what they enjoyed and what could be improved. Consider including a survey link for convenience.
You could also share photos from the class or highlight some stunning arrangements created by participants. This not only builds community but keeps the joy alive long after the class.
Finally, invite them to future classes or workshops. A personal touch can make them feel special and encourage them to keep exploring their floral artistry. Your thoughtful participant follow up will foster lasting connections!
Frequently Asked Questions
What Is the Ideal Number of Participants for a Class?
Studies show that classes with 8-12 participants boost engagement. For your class size, aim for this range—it fosters interaction, allowing everyone to share ideas and learn together, making the experience more enjoyable and fulfilling.
Should I Charge a Fee for the Floral Arrangement Class?
You should charge a fee to reflect your class value. Consider pricing strategies that attract participants while covering costs. A reasonable fee not only enhances commitment but also showcases the quality of what you’re offering.
How Can I Accommodate Participants With Allergies?
You don’t want a sneeze-fest at your class! Use allergy friendly flowers and alternative materials, like faux blooms or dried herbs, ensuring everyone can enjoy creating without worrying about sniffles or itchy eyes.
What Safety Measures Should I Implement During the Class?
When planning your class, make certain you have essential safety equipment ready, like first aid kits. Clearly communicate emergency procedures, so everyone knows what to do if something unexpected happens—keeping the atmosphere relaxed and enjoyable for all.
Can I Host the Class in Inclement Weather?
You can’t host the class outside in inclement weather, but you’ve got indoor alternatives. Just guarantee you’re weather prepared with a backup plan, so everyone can enjoy the creativity without worrying about the storm!