To install a ceiling fan in your gazebo, first choose the right fan size and style for your space. Gather tools like screwdrivers and a voltage tester, then prepare by clearing the area and checking overhead obstructions. Secure the mounting bracket to the ceiling, connect the electrical wiring carefully, and attach the fan blades and light kit. Finally, test the fan for proper operation and make adjustments as needed. Discover more tips to guarantee a successful installation.
Choosing the Right Ceiling Fan for Your Gazebo
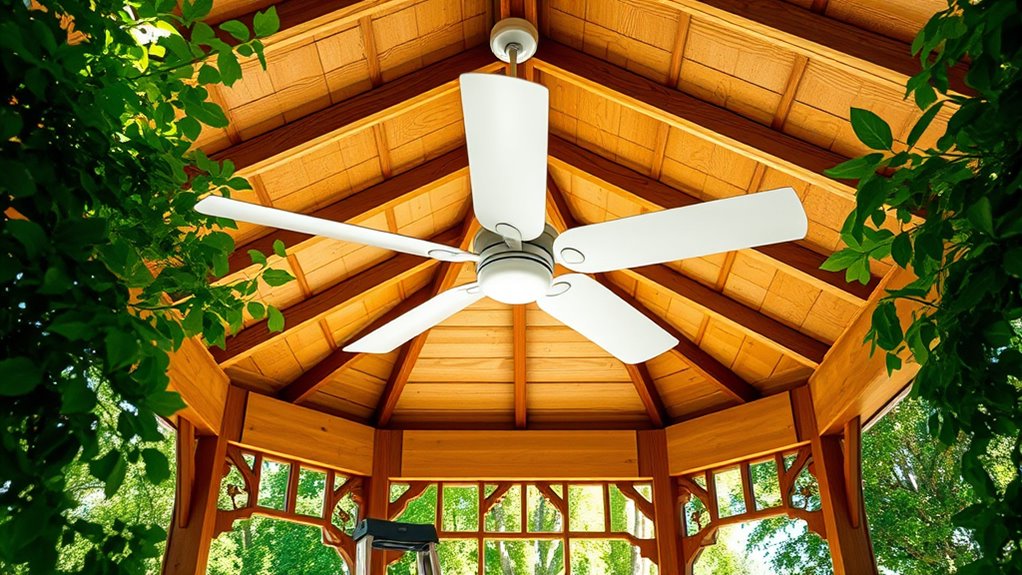
When you’re picking a ceiling fan for your gazebo, what factors should you consider? First, think about the fan size. A larger gazebo may benefit from a bigger fan to circulate air effectively, while a smaller space might need a compact model for balance. Aim for a fan with a blade span between 42 to 56 inches, depending on your gazebo’s dimensions.
Next, consider the fan style. You’ll want a design that complements your outdoor decor—whether it’s modern, rustic, or tropical. Don’t forget to check for weather-resistant materials, especially if your gazebo is exposed to the elements. Choosing the right size and style will not only enhance comfort but also elevate the overall aesthetic of your outdoor retreat. Additionally, it’s crucial to select a fan with a dampness rating suitable for outdoor use to ensure durability and safety.
Gathering the Necessary Tools and Materials
Before you start installing your ceiling fan, it’s vital to gather the right tools and materials. You’ll need essential tools to get the job done efficiently, and having a checklist of materials will guarantee you don’t miss anything important. Don’t forget to prioritize safety equipment to protect yourself during the installation process.
Essential Tools Required
To successfully install a ceiling fan, you’ll need a few essential tools and materials at your disposal. Depending on the fan types you choose, your toolkit may vary, but here’s a basic list to get you started:
| Tool | Purpose | Installation Tips |
|---|---|---|
| Screwdriver | To secure fan brackets | Use both flathead and Phillips |
| Pliers | For gripping and twisting wires | Keep a pair handy for adjustments |
| Wire Strippers | To strip insulation from wires | Strip about an inch for connections |
| Ladder | To reach the installation height | Make sure it’s stable and secure |
| Voltage Tester | To check electrical connections | Always test before touching wires |
With these tools in hand, you’re well on your way to a successful fan installation!
Material Checklist Overview
Gathering the right materials for your ceiling fan installation can make the process smoother and more efficient. Start by determining the fan size that fits your gazebo space, as this affects material types needed for installation. You’ll typically require a ceiling fan kit, which includes the fan blades, motor, and light fixtures if desired. Don’t forget a mounting bracket and screws, as these are vital for securing the fan to the ceiling. Additionally, gather electrical wires, a wire connector, and a remote control if you want extra convenience. A sturdy ladder is also essential for reaching those high spots. By having all your materials ready, you can enjoy the freedom of a well-installed ceiling fan that enhances your outdoor experience.
Safety Equipment Importance
Safety equipment is essential when installing a ceiling fan, as it helps protect you from potential hazards. Before diving into your project, make sure you gather the right safety gear to promote hazard awareness. This not only safeguards you physically but also enhances your confidence as you work.
| Safety Gear | Purpose |
|---|---|
| Safety Goggles | Protects eyes from debris |
| Hard Hat | Shields head from falling objects |
| Gloves | Prevents cuts and abrasions |
Preparing Your Gazebo for Installation
Before you plunge into the installation of your ceiling fan, it’s essential to prepare your gazebo properly. Start by considering the gazebo location—make sure it’s centrally positioned for ideal airflow. Check for any overhead obstructions like beams or decorative elements that could interfere with the fan’s operation. Next, think about weather considerations; if your gazebo is exposed to strong winds or heavy rain, verify your ceiling fan is rated for outdoor use. Clear the area of any debris or furniture that might hinder your work. Finally, double-check that your electrical supply is suitable for the fan you’ve chosen. Additionally, ensure that the gazebo is placed on flat, sturdy ground to maintain stability during installation. With these steps, you’ll create a solid foundation for a smooth, successful installation. Enjoy your newfound freedom with a cool breeze in your gazebo!
Installing the Ceiling Fan Mounting Bracket
With your gazebo prepped and ready for action, it’s time to install the ceiling fan mounting bracket. First, choose the right mounting bracket type based on your fan’s weight and design—there are standard and angled options to evaluate. Make sure the bracket aligns with your ceiling’s structure for a secure hold. Use a stud finder to locate beams, ensuring your installation is stable. When you’re ready, follow these installation tips: mark your drill points accurately, pre-drill holes to avoid splitting wood, and use the appropriate screws for the bracket type. Additionally, ensure the metal frame of the gazebo can support the ceiling fan’s weight to prevent any issues during installation. Tighten everything securely, but be mindful not to overtighten, as this can damage the bracket. Now you’re one step closer to enjoying your breezy escape!
Connecting the Electrical Wiring
Before you start connecting the electrical wiring for your ceiling fan, it’s vital to prioritize safety. You’ll need to understand the different wiring types and guarantee proper grounding techniques are in place. Let’s walk through these essential steps to make your installation safe and effective.
Safety Precautions First
While connecting the electrical wiring for your ceiling fan may seem straightforward, it’s crucial to prioritize safety to prevent accidents. Start by wearing personal protective equipment like gloves and safety glasses. Make certain the power is turned off at the circuit breaker to avoid any electrical hazards. Here’s a quick reference table to keep your safety measures in check:
| Safety Measure | Description | Importance |
|---|---|---|
| Turn Off Power | Switch off the circuit breaker | Prevents electrical shocks |
| Use Insulated Tools | Employ non-conductive tools | Reduces risk of injury |
| Wear Protective Gear | Gloves and glasses | Shields from debris and shocks |
| Check Wiring | Inspect for frayed or damaged wires | Guarantees electrical safety |
| Follow Instructions | Adhere to manufacturer guidelines | Guarantees proper installation |
Wiring Types Explained
After confirming your safety measures are in place, it’s time to focus on the different wiring types you’ll encounter when connecting your ceiling fan. Understanding wiring colors is essential; typically, black or red wires are for power, white wires are neutral, and green or bare wires are for grounding. Always remember, wiring safety is paramount. Make certain to turn off the power at the circuit breaker before you start. If you’re uncertain about any wires, don’t hesitate to consult a professional. This way, you’ll not only guarantee a successful installation, but you’ll also protect yourself and your loved ones. Embrace the freedom of enjoying your gazebo with a cool breeze, knowing you’ve wired it safely and correctly!
Proper Grounding Techniques
To guarantee your ceiling fan operates safely and efficiently, proper grounding techniques are essential. Start by identifying the grounding wire, usually a bare or green copper wire. Connect this wire from your ceiling fan to the grounding terminal in your electrical box. If you’re using grounding methods, make certain all metal parts of the fan are grounded to prevent electrical shocks. Don’t forget to check that your gazebo’s wiring meets local electrical safety codes. After making the connections, secure them with wire nuts and wrap them with electrical tape for added protection. By taking these precautions, you’ll enjoy your ceiling fan in a safe and worry-free environment, ensuring you can fully embrace the freedom of outdoor relaxation.
Attaching the Ceiling Fan Blades and Light Kit
Attaching the ceiling fan blades and light kit is an essential step that can make a significant difference in both functionality and aesthetics. Start by ensuring proper blade alignment; this helps the fan run smoothly and reduces noise. Secure each blade to its respective bracket using the provided screws, tightening them evenly to avoid wobbling. Once the blades are in place, you can move on to the light kit installation. Connect the wiring according to the manufacturer’s instructions, ensuring all connections are secure. Attach the light kit to the fan base, aligning it carefully. Double-check everything before moving on, as a well-installed fan not only enhances your gazebo but also provides the comfort and ambiance you desire. Enjoy your newly functional space!
Testing and Adjusting Your Ceiling Fan
Once you’ve installed your ceiling fan, the next step is to test and adjust it for peak performance. Start by turning on the fan and checking the fan speed. You should be able to switch between low, medium, and high settings easily. Observe how it circulates air in your gazebo—this is key to staying comfortable. If you notice excessive noise, you might need to tighten screws or adjust the blades for better alignment, enhancing noise reduction. Don’t forget to check the light kit too; verify it’s functioning properly. Experiment with different speeds to find what feels right for you, and make any necessary adjustments. Enjoy the freedom of a perfectly balanced breeze in your outdoor space!
Frequently Asked Questions
Can I Install a Ceiling Fan in a Non-Covered Gazebo?
Just like a bird soaring through open skies, you can’t install a standard ceiling fan in non-covered gazebos. Instead, consider outdoor ceiling fans designed specifically for exposure to the elements—freedom with functionality awaits!
What Is the Best Height for Mounting a Ceiling Fan?
For ideal airflow, you should mount your ceiling fan about 8 to 9 feet above the floor. Remember, fan height matters; following these mounting tips guarantees comfort and enhances the freedom of movement in your space.
How Can I Ensure My Ceiling Fan Is Weather-Resistant?
To guarantee your ceiling fan’s weather-resistant, choose models with weather-resistant materials and outdoor fan features. Look for corrosion-resistant finishes and sealed motors to withstand moisture, assuring your fan lasts through all elements while you enjoy outdoor freedom.
Is a Remote Control Necessary for My Gazebo Ceiling Fan?
Imagine a world without remotes—how inconvenient, right? A remote control for your gazebo ceiling fan offers convenience, allowing you to adjust settings easily. Plus, it enhances the fan’s features, giving you ultimate comfort and freedom.
Can I Use an Extension Rod for My Ceiling Fan Installation?
Yes, you can use an extension rod for your ceiling fan installation. Extension rods offer benefits like improved airflow and aesthetic appeal, but consider ceiling height and fan weight to guarantee a safe, stable setup.