To organize a home repair DIY session in your gazebo, start by choosing a clear day with comfortable temperatures. Gather all your tools and materials, making certain everything is in good condition. Set up the gazebo by decluttering and creating designated work zones. Make the atmosphere inviting with cozy seating and ambient lighting. Finally, plan for clean-up by designating a waste area. If you want more tips to guarantee a successful session, there’s plenty more to take into account.
Choose the Right Time for Your DIY Session
When’s the best time to tackle your home repair DIY session? It all boils down to timing—both regarding weather and your personal schedule. You’ll want to choose a day when the best weather is on your side; that means clear skies and comfortable temperatures. After all, no one enjoys working in the sweltering heat or pouring rain.
Take a look at your calendar and identify a block of time that suits you. Weekends can be ideal for longer projects, but don’t overlook those quiet weekday evenings. Finding a time that aligns with your routine guarantees you won’t feel rushed or distracted.
Gather Necessary Tools and Materials
Before you start your DIY session, you’ll want to gather all the essential tools and materials you’ll need for the job. Creating a checklist of tools guarantees you won’t miss anything vital, while selecting the right materials will secure a successful repair. Let’s break down what you need to get started!
Essential Tools Checklist
To tackle any home repair project successfully, it’s essential to gather the right tools and materials beforehand. Start by listing essential tool types: a hammer, screwdrivers, pliers, a tape measure, and a level. Depending on your project, you might also need a power drill, saw, or paintbrushes. Organize these tools in a dedicated tool storage system, like a toolbox or pegboard, so you can easily find what you need. Check that all tools are in good condition and ready for use. Don’t forget safety gear like gloves and goggles! With your tools organized and accessible, you’ll feel empowered to embark on your DIY project without unnecessary delays. Enjoy the freedom of crafting your space!
Material Selection Tips
Selecting the right materials is just as essential as having the right tools for your DIY home repair session. Start by identifying the material types you’ll need based on your project requirements. Whether it’s wood, drywall, or plumbing supplies, knowing what fits your vision is key. Next, consider budget considerations—set a spending limit to avoid overspending. Research different brands and options; sometimes, a less expensive choice can still offer quality and durability. Don’t forget to check local regulations or codes if you’re working on structural elements. Gathering the right materials in advance saves you time and hassle, allowing you to focus on what really matters: bringing your DIY vision to life in that cozy gazebo.
Set Up Your Gazebo for Maximum Efficiency
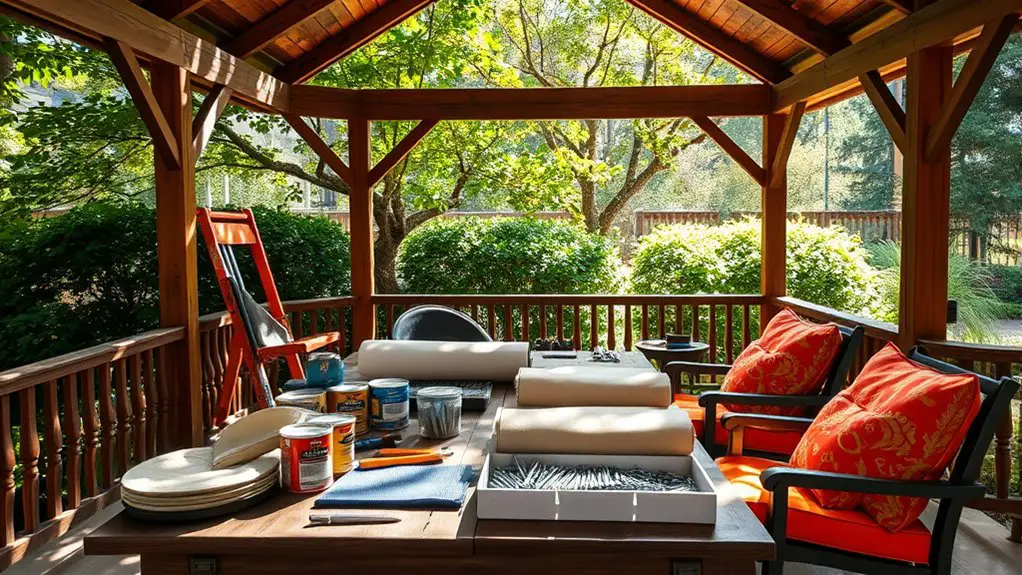
Before you start your DIY session, make sure your gazebo is ready for action. Clear the area of any clutter, gather your essential tools, and check that you have proper lighting. This setup will help you work more efficiently and keep everything within reach. Additionally, consider installing mosquito netting to create a comfortable working environment free from pests.
Clear the Area
How can you guarantee your gazebo area is perfectly set up for a smooth DIY repair session? Start by clearing the area of any clutter. A clean space not only boosts your productivity but also enhances safety. Here’s how to get it done:
- Clear debris: Remove any leaves, branches, or old equipment that may have accumulated.
- Organize supplies: Group your materials by type to facilitate easy access.
- Create work zones: Designate specific areas for different tasks, like cutting or assembling.
- Ensure good lighting: Make certain your gazebo is well-lit to avoid any accidents.
With a tidy workspace, you’ll find it much easier to focus on your project and enjoy the freedom of DIY repairs!
Gather Essential Tools
To guarantee your DIY repair session runs smoothly, gathering the right tools is essential. Start by identifying the tool types you’ll need—like hammers, screwdrivers, and pliers. Depending on your project, you might also need power tools like drills or saws. Make sure to check their condition beforehand; tool maintenance can save you time and frustration during your session. Clean and oil your tools as needed, ensuring they’re ready for action. Organize them in your gazebo, keeping frequently used items within arm’s reach. This setup not only boosts efficiency but also creates a comfortable workspace where you can freely immerse yourself in your repairs. With the right tools at hand, you’ll feel empowered to tackle any project that comes your way!
Ensure Proper Lighting
With your tools gathered and ready, the next step is to make sure your gazebo is well-lit for your DIY repair session. Good lighting can drastically improve your efficiency and safety. Here are some tips to achieve that:
- Maximize Natural Light: Position your workspace near the gazebo’s openings to take advantage of sunlight.
- Use Adjustable Lighting: Incorporate lamps or string lights that you can easily reposition as needed.
- Install Dimmer Switches: If you have electrical access, dimmer switches let you control brightness for different tasks.
- Add Reflective Surfaces: Use light-colored or reflective materials to enhance the overall brightness.
Organize Your Workspace
Before diving into your DIY home repair session, it’s essential to have your workspace organized. A well-thought-out workspace layout can greatly enhance your efficiency and creativity. Start by clearing the area in your gazebo, ensuring you have enough room to move freely.
Next, think about tool organization. Group similar tools together—keep your hammers, screwdrivers, and pliers in one area, while paintbrushes and rollers can have their own designated spot. Using toolboxes or pegboards can make accessing what you need a breeze. Additionally, ensure that your gazebo is properly anchored to prevent any accidents during your repairs.
Don’t forget to have a clear surface for your projects, free from clutter. This allows you to visualize your work and stay focused. By taking the time to organize your workspace, you’ll find that you can complete your home repairs more smoothly, leaving you with the freedom to enjoy the fruits of your labor in your cozy gazebo.
Create a Comfortable Atmosphere
Once your workspace is organized, creating a comfortable atmosphere is the next step to guarantee a productive DIY session. When you feel at ease, you’ll find it easier to focus on your tasks. Here are some tips to enhance your gazebo’s vibe:
- Cozy seating: Add cushions or a comfy chair to keep you relaxed.
- Ambient lighting: Use string lights or lanterns to create a warm glow.
- Temperature control: Keep a fan or portable heater nearby to maintain a pleasant climate.
- Personal touches: Incorporate plants or artwork that inspire you. Additionally, consider using soft lighting to enhance the overall ambiance and make the space inviting.
Involve Family and Friends
Involving family and friends can transform your DIY session into a fun and collaborative experience. When you gather your loved ones, you’re not just tackling home repairs; you’re creating opportunities for team bonding and skill sharing. Each person brings their unique talents, whether it’s painting, hammering, or simply providing encouragement.
Start by assigning specific tasks based on everyone’s strengths. This way, you’ll not only work efficiently but also learn from each other along the way. As you collaborate, share tips and tricks, making the process enjoyable and educational. Don’t forget to keep the atmosphere light! Play music, share snacks, and celebrate small victories together.
Plan for Clean-Up and Disposal
While diving into a DIY home repair session, it’s essential to plan for clean-up and disposal to make certain your space returns to normal swiftly and efficiently. You don’t want leftover materials cluttering your gazebo or yard. Here are some tips to help you manage waste effectively:
- Set up a designated waste area for different materials.
- Research local recycling options to make sure you’re disposing of materials responsibly.
- Use reusable containers for small parts and tools to minimize waste.
- Create a waste management checklist so you know what to do with each item post-project.
Enjoy Your Accomplishments and the Outdoors
After successfully completing your home repair project, take a moment to savor your accomplishments and enjoy the outdoors. Step outside your gazebo and bask in the fresh air; it’s the perfect time for outdoor relaxation. Perhaps you could set up a cozy seating area with some cushions and a rejuvenating drink, allowing yourself to truly appreciate the work you’ve done.
Celebrate your accomplishment with a small gathering, inviting friends or family to join you. Share your DIY success stories, and maybe even inspire others to tackle their own projects. This isn’t just about the repairs; it’s about enjoying the freedom that comes from creating a comfortable and functional space. Gazebos offer aesthetic appeal that enhances your outdoor experience and sets the perfect atmosphere for relaxation and celebration.
Frequently Asked Questions
What Types of Home Repairs Are Best Suited for a Gazebo?
When considering home repairs in a gazebo, outdoor painting and furniture restoration are ideal. You’ll enjoy the fresh air while transforming your space, creating a perfect atmosphere for creativity and relaxation in your backyard.
How Can I Ensure Safety During My DIY Session?
Before you commence on your DIY journey, think of safety as your shield. Always wear safety gear, create an emergency plan, and keep first aid nearby. Freedom in creativity thrives when you’re protected and prepared!
What Should I Do if It Rains During the Session?
If it rains during your session, don’t worry! Shift your focus to indoor rainy day activities or find an alternative location. Embrace the change, and keep your DIY spirit alive with creative projects indoors.
Can I Host a DIY Session With Limited Space in My Gazebo?
Sure, you can host a DIY session in your gazebo, even if it feels like a sardine can! Just master space management and tool organization; it’ll keep you free to create without chaos.
How Do I Choose the Right Lighting for Evening Projects?
When choosing outdoor lighting, consider brightness and placement for ideal project visibility. Use adjustable LED lights or string lights to create a cozy atmosphere while ensuring you can see your work clearly during evening projects.