To plan a successful handmade pillow and textile workshop under your gazebo, start by choosing an ideal date and time that suits your participants. Invite them through social media with enticing visuals and personalized messages. Select a variety of quality materials and tools, then arrange your gazebo to create a welcoming and collaborative atmosphere. Plan a balanced agenda with hands-on activities and showcase finished creations for inspiration. With these steps, you’ll create a memorable crafting experience that resonates.
Choosing the Right Date and Time
When should you schedule your handmade pillow workshop to ascertain maximum participation? Consider seasonal considerations and participant availability to find the ideal date and time. Spring and summer often bring a sense of freedom, making these seasons perfect for outdoor workshops. People usually have more flexible schedules during weekends or holiday breaks, which can boost attendance.
To ascertain you’re reaching your audience, survey potential participants about their availability. This can help you pinpoint the best days and times that fit their lifestyles. Evenings and late afternoons are generally more accommodating for those juggling work and family commitments.
Keep an eye on local events and holidays, too. Avoid scheduling your workshop on days when your target audience might be preoccupied. By thoughtfully selecting your date, you’ll create an inviting atmosphere that encourages creativity and connection, making your handmade pillow workshop a success.
Inviting Participants
To guarantee your handmade pillow workshop attracts a diverse group of participants, it’s essential to craft an inviting message that resonates with your target audience. Start by identifying who you want to attend—are they beginners or seasoned crafters? Tailor your promotional strategies accordingly.
Utilize social media platforms to share vibrant images of your past projects, emphasizing the joy of creativity. Create engaging posts that highlight the unique experience participants will gain, like learning new skills while enjoying a relaxed atmosphere under your gazebo.
Consider hosting a free introductory session or a Q&A to spark interest. Collaborating with local community groups can also expand your reach. Don’t forget to ask participants to share your workshop with friends; word-of-mouth can be your best ally. By connecting authentically with your audience, you’ll inspire them to join you in this creative journey.
Selecting Materials and Tools
Selecting the right materials and tools is essential for your handmade pillow workshop, as they can greatly impact the quality and enjoyment of the crafting experience. In order to create beautiful pillows, you’ll want to focus on diverse fabric types and precise tool selection.
Here are three key items to take into account:
- Fabric: Choose a variety of fabrics—cotton, linen, or velvet—to give participants options that suit their style and comfort preferences.
- Filling: Opt for high-quality pillow inserts or stuffing materials, like polyester or down alternatives, to guarantee a plush feel.
- Tools: Stock essential tools like scissors, rotary cutters, and sewing machines. Don’t forget items like pins and measuring tapes for precise work.
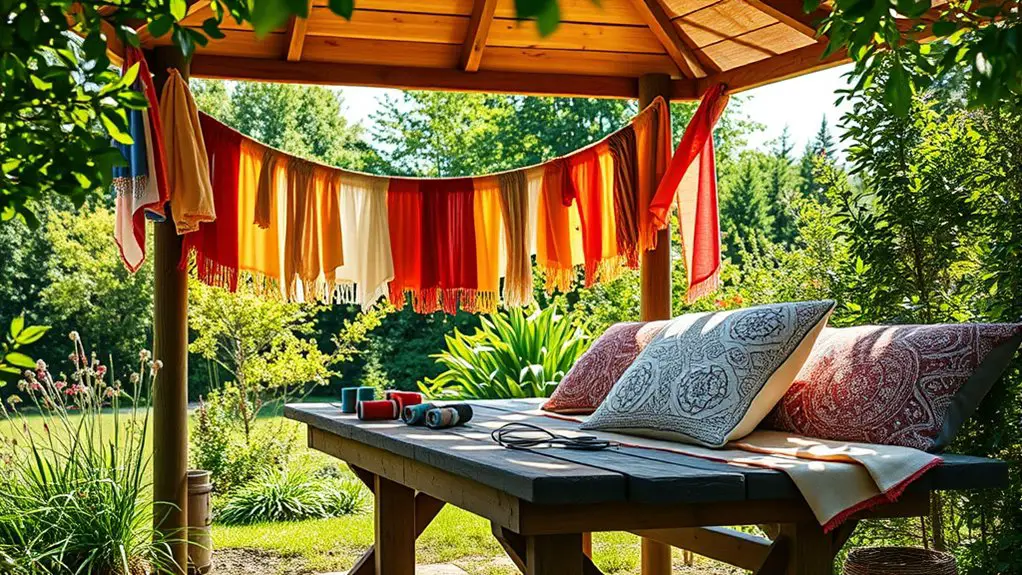
Setting Up Your Gazebo
After gathering your materials and tools, it’s time to focus on setting up your gazebo for the workshop. Think about your gazebo layout: how you want participants to move around and interact. Arrange tables and chairs in a way that encourages creativity and collaboration while keeping the space open. Consider adding some outdoor decor, like string lights or potted plants, to create a warm, inviting atmosphere. Additionally, make sure to incorporate comfortable seating options that allow participants to relax as they work.
Here’s a simple layout plan to visualize:
| Area | Purpose |
|---|---|
| Center Table | Crafting and sewing station |
| Side Tables | Material storage and displays |
| Seating Area | Relaxation and chatting |
With this setup, you’ll create a cozy environment that inspires freedom and creativity. Let the natural beauty of your surroundings enhance the experience, making your handmade pillow workshop truly memorable.
Planning the Workshop Agenda
Crafting a well-structured agenda is essential for a successful handmade pillow workshop, as it keeps participants engaged and guarantees smooth shifts between activities. To create an effective plan, start with brainstorming activities that excite and inspire creativity. Here’s how you can outline your agenda:
- Introduction (15-20 mins): Welcome everyone, discuss the workshop goals, and introduce the materials.
- Hands-on Activities (60-90 mins): Allocate time for sewing, stuffing, and personalizing pillows. Encourage participants to explore their styles while you facilitate.
- Wrap-up and Sharing (30 mins): Create space for participants to showcase their creations and share experiences.
When setting timeframes, be flexible yet focused. This balance allows participants to express their creativity while ensuring you stay on track. With a clear agenda, you’ll foster an enjoyable atmosphere, empowering everyone to create unique pillows under your gazebo!
Providing Instruction and Guidance
To create your handmade pillow, you’ll need a variety of materials and tools, so let’s make certain you’ve got everything on hand. I’ll guide you through each step, breaking down the techniques to guarantee you feel confident as you stitch and assemble. Together, we’ll transform fabric and stuffing into a beautiful, personalized piece that adds charm to your space.
Materials and Tools Needed
Creating a cozy handmade pillow requires a few essential materials and tools to bring your vision to life. You’ll want to gather a variety of fabric types to make your pillow uniquely yours. Consider cotton, linen, or even a soft fleece for comfort. Here’s what you’ll need to get started:
- Fabric: Choose your favorite fabric types in colors or patterns that inspire you.
- Sewing Tools: A sewing machine, scissors, and pins are vital for assembling your pillow.
- Stuffing: Opt for polyester fill or natural alternatives like cotton or wool to give your pillow that plush feel.
With these materials and tools, you’re well on your way to creating beautiful, handmade pillows that express your creativity and style!
Step-by-Step Techniques
Starting your handmade pillow is an exciting journey, and following a clear set of techniques will make the process enjoyable and rewarding. First, choose your pillow patterns—consider geometric shapes or floral designs that inspire you. Next, gather your fabric, ensuring it complements your chosen patterns. Using basic textile techniques, like straight stitching and serging, will help you create a polished look. Cut your fabric according to the pattern dimensions, and pin the pieces together securely. As you sew, keep your seams even and neat. Once you’ve assembled your pillow, stuff it to your desired firmness and sew the final seam closed. Finally, place your creation under the gazebo, and revel in your newfound craft! Enjoy the freedom to express your creativity!
Creating a Comfortable Atmosphere
How can you transform a simple workshop into a cozy haven that inspires creativity? It’s all about the atmosphere you create. Start by ensuring your space feels inviting and comfortable. Here are three key elements to contemplate:
- Cozy Seating: Use cushions, poufs, or folding chairs with soft covers to encourage relaxation and creativity. The more comfortable your guests feel, the more they’ll enjoy the experience.
- Ambient Lighting: Incorporate warm, soft lighting. String lights or lanterns can add a magical touch, making the space feel intimate and welcoming, perfect for those creative vibes.
- Decorative Touches: Add plants, textiles, or art that resonate with the theme of your workshop. These little details can spark inspiration and make the environment feel more personal. Consider incorporating soft lighting to enhance the overall atmosphere and encourage creativity.
Showcasing Finished Creations
Now it’s time to showcase your finished creations, highlighting the unique designs that reflect your personal flair. Consider how the varied textures can add depth and interest, inviting others to experience the pillows up close. Each piece tells a story, so don’t hesitate to share the inspiration behind your work, making your display truly memorable.
Highlight Unique Designs
In the vibrant world of handmade pillows, each creation tells a unique story, woven from the artist’s imagination and craftsmanship. To truly highlight these unique designs, consider showcasing finished creations that embody your vision. Here are three ways to share your inspirations:
- Diverse Textile Patterns: Use an array of textile patterns to create a visual feast, allowing each pillow to stand out.
- Design Inspiration Boards: Curate boards that illustrate the journey from concept to creation, helping participants connect with your artistic process.
- Interactive Display: Set up a space where visitors can touch and feel the textures, experiencing the quality and thoughtfulness behind each piece.
Display Textural Variety
As you explore the world of handmade pillows, you’ll quickly realize that textural variety is key to creating enchanting pieces. Showcasing finished creations allows you to highlight diverse textile textures and fabric combinations, inviting others to appreciate your craft.
Here’s a table showcasing different textures and their potential fabric pairings:
| Texture Type | Suggested Fabrics | Use Case |
|---|---|---|
| Soft Velvet | Cotton, Linen | Cozy indoor pillows |
| Crisp Canvas | Burlap, Chenille | Rustic outdoor decor |
| Sheer Organza | Silk, Tulle | Elegant accents |
| Chunky Knit | Wool, Acrylic | Warm, cozy vibes |
| Smooth Satin | Polyester, Silk | Luxurious finishes |
Encourage Personal Stories
What stories do your handmade pillows hold? Each creation can be a reflection of your personal experiences and the crafting memories you’ve built along the way. Sharing these stories not only celebrates your work but also inspires others to connect with their own narratives.
Consider highlighting:
- Inspiration: What sparked the design idea? Was it a cherished moment or a favorite color?
- Techniques: Did you try a new stitching method or upcycle materials? Share the journey!
- Meaning: What emotions does this pillow evoke? Is it a gift with a special story behind it?
Encouraging personal stories enriches your workshop experience, making it more than just crafting—it’s about celebrating individuality and creativity.
Frequently Asked Questions
Can I Host the Workshop if It Rains?
Yes, you can host the workshop if it rains! Just have indoor alternatives ready and make certain you’ve made weather preparations. Flexibility will guarantee everyone enjoys the experience, rain or shine. Embrace the creativity!
How Many Participants Can Fit Under My Gazebo?
To determine how many participants can fit under your gazebo, consider its dimensions and participant spacing. A well-organized layout allows for comfort and creativity, typically accommodating six to eight people, depending on the gazebo’s size.
What Is the Ideal Age Range for Participants?
The ideal age range for participants is typically 8 to 16. This age group fosters child development, allowing them to enhance crafting skills while enjoying creative freedom, making it a perfect fit for your workshop’s atmosphere.
Should I Provide Refreshments for Attendees?
Providing refreshments can enhance your workshop experience. Consider diverse refreshment options and dietary considerations, like gluten-free or vegan snacks, to accommodate everyone’s preferences. This thoughtful touch will make attendees feel welcomed and appreciated.
Can I Charge a Fee for the Workshop?
Did you know that 75% of workshops charge fees? Setting a fair workshop pricing not only covers costs but also provides participant incentives. It creates a valued experience, encouraging creativity and connection among attendees.