To set up a gazebo for your gardening DIY classes, first choose a location that offers sunlight and shelter from wind. Select a style that complements your garden aesthetic. Prepare the ground by leveling it and ensuring proper drainage. Assemble your gazebo with necessary tools, then add comfortable seating options like cushioned benches. Enhance the atmosphere with seasonal decorations and proper lighting for evening classes. There’s more to contemplate to make your classes a success, so keep exploring!
Choosing the Right Location for Your Gazebo
Where should you place your gazebo to maximize its benefits for gardening? Start by considering sunlight exposure. Ideally, position your gazebo where it can filter sunlight, providing shade to your plants during the hottest parts of the day while still allowing enough light for growth. Next, think about wind protection; placing your gazebo near natural barriers like trees or hedges can shield your garden from harsh winds that could damage delicate plants. This strategic location not only enhances your gardening environment but also creates a serene space for relaxation. Remember, the right spot can boost your gardening success and provide a peaceful retreat, blending freedom with nature’s beauty. Additionally, ensure that the gazebo is easily accessible for maintenance and frequent use, as this will encourage you to spend more time in your garden. Enjoy the process of finding that perfect location!
Selecting the Ideal Gazebo Style
After you’ve found the perfect location for your gazebo, it’s time to contemplate the style that best complements your gardening space. Consider modern gazebo styles if you want a sleek, contemporary look that harmonizes with minimalist gardens. These often feature clean lines and a variety of materials, perfect for a fresh, open vibe. On the other hand, traditional gazebo designs exude charm and nostalgia, often crafted from wood with intricate details. They create a cozy atmosphere, ideal for more classic garden settings. Think about how each style will enhance your outdoor experience and match the overall aesthetic of your gardening area. Choose a design that not only looks good but also feels right for your gardening classes. A Rotunda gazebo can add elegance and a unique focal point to your garden, perfect for hosting classes.
Preparing the Ground for Installation
Before you start installing your gazebo, taking the time to prepare the ground is essential for guaranteeing a stable and long-lasting structure. Begin with soil preparation by clearing away any debris, rocks, or vegetation. This not only creates a clean workspace but also helps prevent drainage issues later. Next, focus on ground leveling; you want the area as flat as possible. Use a shovel or rake to create an even surface, checking with a level to guarantee accuracy. If your soil is particularly uneven, consider adding or removing soil as needed. Finally, compact the soil to provide a solid foundation. According to local building codes, ensuring proper drainage is vital to prevent any future water damage to your gazebo. With the ground prepared, you’re ready to move on to assembling your gazebo, guaranteeing it stands strong and secure.
Assembling Your Gazebo: Step-by-Step Guide
With the ground properly prepared, you’re all set to assemble your gazebo. Follow these assembly tips to guarantee a smooth process:
With the ground ready, you’re primed to assemble your gazebo smoothly with these helpful tips.
- Gather Your Tools: Organize your tools—wrenches, hammers, and screwdrivers—so everything’s within reach.
- Read the Instructions: Familiarize yourself with the assembly manual; it’ll save you time and potential headaches.
- Start with the Base: Lay out the base pieces on your prepared ground, guaranteeing everything’s aligned properly.
- Construct the Frame: Assemble the vertical posts and connect them with the roof beams, making sure to secure each joint tightly. Additionally, ensure that you count and group poles by length and thickness for better organization during assembly.
Adding Comfortable Seating Arrangements
When setting up your gazebo, adding comfortable seating arrangements is key to creating a relaxing garden retreat. You’ll want to select ideal seating options that suit your style and needs while ensuring accessibility for everyone. Don’t forget to enhance comfort features, like cushions or footrests, to make your space truly inviting. Incorporating comfortable seating options will not only encourage relaxation but also foster a welcoming atmosphere for your gardening DIY classes.
Selecting Ideal Seating Options
Creating a cozy and inviting atmosphere in your gazebo is essential for enjoying your garden space, and selecting the right seating options plays a key role in that. You’ll want to reflect on comfort levels and how your seating arrangements can enhance the experience. Here are some ideal seating options to think about:
- Adirondack Chairs – These provide great back support and a relaxed vibe.
- Cushioned Benches – Perfect for accommodating larger groups while keeping comfort in mind.
- Folding Chairs – Flexible and easy to store, they’re great for varying class sizes.
- Floor Cushions – Offer a casual, bohemian feel and allow for easy rearranging.
Choose seating that encourages relaxation and interaction, making your gardening classes a true delight!
Arranging for Accessibility
To guarantee everyone can enjoy the beauty of your gazebo, it’s important to arrange seating that accommodates all guests comfortably. Start by ensuring wheelchair access to the seating areas; this includes making pathways wide enough for mobility devices. A minimum clearance of 36 inches is recommended to allow easy navigation. Choose chairs that are easy to get in and out of, offering support without being too heavy to move. Consider incorporating varied seating options, such as benches and individual chairs, to cater to different preferences. Finally, maintain clear pathways around the seating to prevent any obstructions, ensuring everyone can freely move about. With these thoughtful arrangements, your gazebo becomes an inviting space for all.
Enhancing Comfort Features
While a gazebo offers a beautiful backdrop for your garden, adding comfortable seating arrangements can transform it into a cozy retreat. To enhance comfort, consider these key elements:
- Cushioned Chairs: Opt for weather-resistant chairs with plush cushions that invite relaxation.
- Outdoor Sofas: Create a lounge vibe with spacious sofas, perfect for group discussions or workshops.
- Ottomans: Add versatile ottomans that can serve as seating or footrests, giving everyone a chance to kick back.
- Throw Pillows: Incorporate colorful throw pillows for extra comfort and style, making the space feel inviting.
With these comfortable accessories, you’ll provide not only seating but also weather protection, ensuring your gardening classes are enjoyable for all.
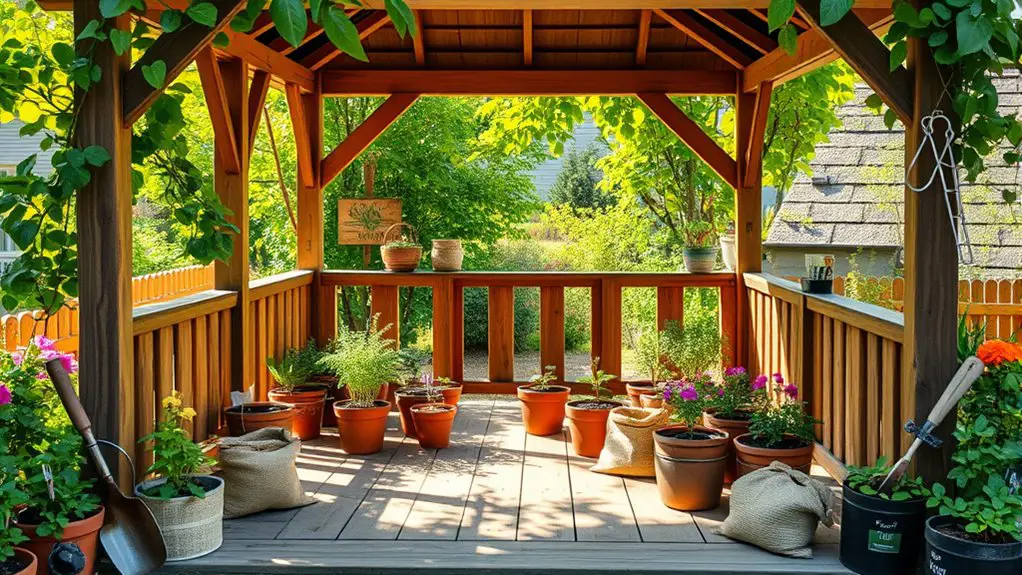
Incorporating Gardening Supplies and Tools
As you design your gazebo for gardening, it’s essential to think about how you’ll incorporate your supplies and tools effectively. Start by creating designated areas for your gardening tools, like shovels, trowels, and pruners. You might use wall-mounted racks or pegboards to keep everything organized and within reach, making it easier for participants to grab what they need. Consider adding shelves or carts for pots, soil, and fertilizers, enhancing your supply organization. A small table can serve as a workspace for planting or potting, while bins or baskets can hold smaller items. By thoughtfully arranging these elements, you’ll create a functional space that encourages creativity and freedom, helping everyone engage in their gardening adventures with ease.
Enhancing the Atmosphere With Decorations
To truly bring your gazebo to life, consider choosing themed decorations that reflect your personal style and the gardening vibe you want to create. Incorporating natural elements like potted plants, wooden accents, or stone features can enhance the organic feel of your space. With the right touches, you can transform your gazebo into a cozy retreat that invites relaxation and creativity. Additionally, adding climbing plants can provide natural shade and contribute to the overall aesthetic appeal of your gazebo.
Choose Themed Decorations
Creating a charming atmosphere in your gazebo can elevate your gardening experience, making it a delightful retreat. Choosing themed decorations not only reflects your personality but also sets the mood for your classes. Here are some ideas to inspire you:
- Themed Colors: Pick a color palette that resonates with the season—think pastels for spring or warm hues for autumn.
- Seasonal Motifs: Incorporate elements like pumpkins in fall or flowers in spring to celebrate each season’s beauty.
- Functional Decor: Use items like planters and garden tools as decorative pieces, blending utility with aesthetics.
- Banners and Signage: Create banners that promote your classes, adding a personal touch while keeping things organized.
These decorations will help create a welcoming environment for your gardening sessions!
Incorporate Natural Elements
In addition to themed decorations, incorporating natural elements can greatly enhance the atmosphere of your gazebo. Using natural materials like wood, stone, and greenery not only looks beautiful but also aligns with an eco-friendly design. Consider adding wooden benches, stone pathways, or even potted plants to create a warm and inviting space. You might also want to hang natural fiber lanterns or use jute table runners to bring in that organic feel. These elements not only reflect the beauty of nature but also promote sustainability, making your gardening classes feel more connected to the environment. By blending these natural touches, you’ll create a serene haven where creativity can flourish, allowing everyone to enjoy the freedom of gardening.
Setting Up Lighting for Evening Classes
Setting up effective lighting for evening classes can dramatically enhance the learning environment. Here are some ideas to get you started:
- String Lights: Hang these around the gazebo for a warm, inviting ambiance. They create an ambient glow that sets the mood.
- Solar Lanterns: These are eco-friendly and add a charming touch. Just place them on tables or hang them from hooks.
- Adjustable Fixtures: Use adjustable task lighting to focus on specific areas. This guarantees everyone can see what they’re working on.
- Waterproof Options: Consider waterproof lighting for durability, especially if you’re in an area prone to rain. Additionally, opting for energy-efficient designs can help reduce electricity bills while maintaining a vibrant atmosphere.
With these lighting solutions, your evening gardening classes will be both functional and enjoyable!
Planning Your Gardening Curriculum
When planning your gardening curriculum, it’s essential to start by defining your learning objectives so students know what they’ll achieve. Next, select topics that align with those goals and spark interest among your participants. Finally, schedule your class sessions thoughtfully to guarantee a smooth flow of information and hands-on practice.
Define Learning Objectives
To effectively plan your gardening curriculum, it’s essential to define clear learning objectives that guide your teaching and help learners stay focused. Setting specific learning goals guarantees participants know what to expect and can track their progress. Here are some key objectives to contemplate for skill development:
- Understand the basics of soil health and plant nutrition.
- Learn practical techniques for planting and maintenance.
- Explore organic gardening practices and pest management.
- Cultivate creativity in garden design and plant selection.
Select Appropriate Topics
Selecting appropriate topics for your gardening curriculum is essential, as it shapes the learning experience and keeps participants engaged. Start by considering various aspects of garden design, like choosing plants, creating a layout, and incorporating sustainable practices. Each session should follow a class format that encourages hands-on learning, allowing participants to apply concepts directly.
Consider topics such as container gardening, organic methods, or seasonal planting to cater to different interests. Additionally, integrating creative elements, like floral arrangements or herb gardens, can inspire freedom in expression. By choosing diverse and relevant topics, you can foster a vibrant community of budding gardeners who feel empowered to grow their skills and knowledge.
Schedule Class Sessions
How often should you schedule class sessions to keep your gardening curriculum engaging? Finding the right class frequency is essential for maximizing participant engagement and ensuring everyone stays motivated. Here are some tips to help you plan:
- Weekly Sessions: Encourage consistent learning and practice.
- Biweekly Workshops: Allow participants to absorb information and apply it in their gardens.
- Monthly Themes: Focus on specific topics, giving depth to each session.
- Seasonal Classes: Align with planting seasons to keep content relevant and exciting.
Promoting Your DIY Gardening Classes
Promoting your DIY gardening classes can be a rewarding experience, both for you and your community. Start by leveraging social media platforms like Facebook and Instagram to share eye-catching visuals of your classes and the beautiful plants participants will create. Create engaging posts that invite your followers to join in on the fun. Don’t underestimate the power of email marketing, either! Send out newsletters to your subscribers, detailing class schedules, topics, and any special promotions. Encourage word-of-mouth by asking your participants to share their experiences online. Collaborating with local businesses or gardening clubs can also expand your reach. By spreading the word effectively, you’ll inspire more people to embrace their green thumbs and connect with nature.
Frequently Asked Questions
What Is the Best Time of Year to Start Gardening Classes?
Did you know 80% of gardeners start in spring? It’s the perfect time for you to launch gardening classes, focusing on seasonal crops. Spring planting energizes participants, encouraging creativity and freedom in their gardening journey.
How Many Participants Can Fit Comfortably in the Gazebo?
When considering participant capacity, think about your gazebo layout. Depending on its size, you can typically accommodate 10 to 15 people comfortably. This guarantees everyone has space to engage and enjoy their experience.
What Types of Plants Are Best for Beginner Gardeners?
If you’re looking to dip your toes into the garden, consider starting with herbs like basil and mint. For flower selection, marigolds and zinnias are perfect. They’ll bring joy without overwhelming your gardening spirit!
Are There Any Permits Needed for Outdoor Classes?
Before hosting outdoor classes, check local legal requirements and class regulations. Depending on your location, you might need permits for gatherings or specific activities. It’s always best to guarantee you’re compliant for a smooth experience.
How Can I Protect My Gazebo From Extreme Weather?
To protect your gazebo from extreme weather, use weather proofing materials like waterproof seals and durable covers. Regular gazebo maintenance, including inspections and repairs, guarantees its longevity and keeps it standing strong against nature’s challenges.