To set up your gazebo for woodworking classes, start by choosing a durable structure with enough space for your tools and materials. Equip it with essential tools like a circular saw and drill, and prioritize safety with proper gear and a fire extinguisher. Create distinct work zones for cutting and assembly while ensuring good ventilation and lighting. Incorporating effective storage solutions can keep your space organized. There’s more to reflect on for optimizing your setup and enhancing the experience.
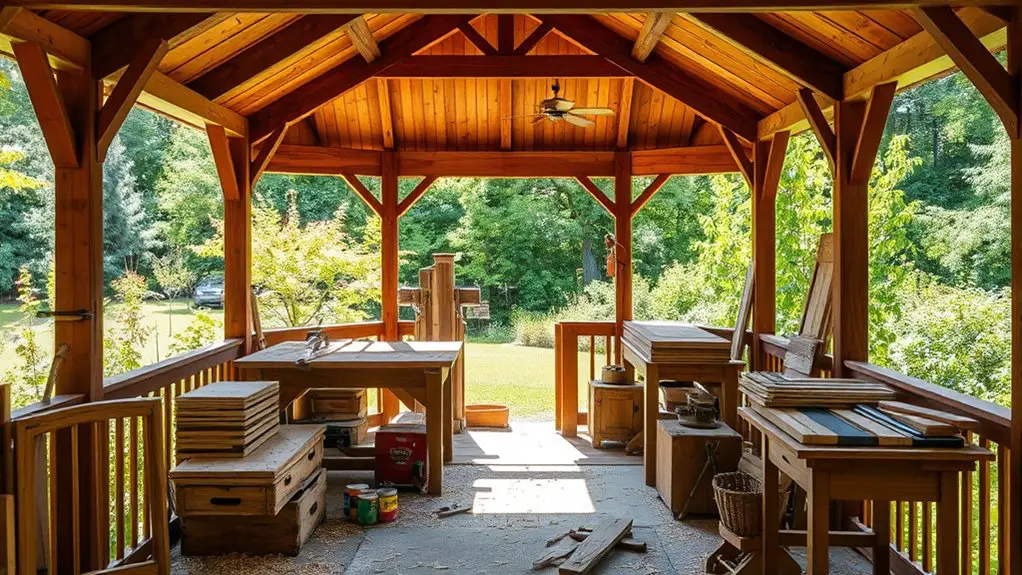
Choosing the Right Gazebo for Woodworking
When you’re choosing the right gazebo for woodworking classes, it’s crucial to contemplate both functionality and space. Start by evaluating your workspace size; make sure it accommodates your tools and materials comfortably. A larger gazebo allows for better organization and movement, promoting a free-flowing creative environment.
Next, consider gazebo materials. Opt for durable, weather-resistant options like aluminum or treated wood to withstand outdoor conditions. The right materials not only enhance longevity but can also provide a more inviting atmosphere for your classes. Additionally, consider incorporating essential features like lighting for nighttime use, as this can enhance your overall woodworking experience.
Don’t forget about ventilation and natural light, as these factors can greatly impact your woodworking experience. By carefully selecting a gazebo that meets these criteria, you’ll create a versatile and enjoyable workspace tailored to your woodworking needs.
Essential Tools and Equipment for Your Workshop
To create a successful woodworking workshop in your gazebo, you’ll need to gather essential tools and equipment. Start by focusing on must-have tools, ensuring you prioritize safety equipment, and setting up a sturdy workbench. This foundation will help you foster a productive and enjoyable learning environment for your classes.
Must-Have Tools
Setting up a woodworking workshop requires at least five essential tools to guarantee you can tackle a variety of projects effectively. Having the right mix of hand tools and power tools not only boosts your efficiency but also enhances your creativity. Here’s a quick list of must-have tools:
- Circular saw: Great for making straight cuts quickly.
- Chisels: Essential for precise carving and shaping.
- Drill: Versatile for drilling holes and driving screws.
- Workbench: Provides a sturdy surface for all your projects.
With these tools in your gazebo workshop, you’ll be well-equipped to explore your woodworking passion. The freedom to create is at your fingertips, so get started and enjoy the process!
Safety Equipment Essentials
Safety should always be your top priority in a woodworking workshop, especially when working in a gazebo setting. To guarantee a safe environment, equip yourself and your students with essential safety gear. This includes protective eyewear, hearing protection, and dust masks. Additionally, familiarize everyone with emergency procedures in case of accidents.
Here’s a quick reference table for essential safety equipment:
| Safety Gear | Purpose | Emergency Procedure |
|---|---|---|
| Protective Eyewear | Prevents eye injuries | Locate first aid kit |
| Hearing Protection | Reduces noise exposure | Know evacuation routes |
| Dust Masks | Filters harmful particles | Report injuries immediately |
| Gloves | Protects hands from cuts | Administer first aid |
Implementing these essentials will enhance safety and create a more enjoyable woodworking experience.
Workbench Setup Tips
Creating a productive woodworking space involves more than just safety gear; having a well-organized workbench is equally important. Start by selecting the right workbench materials to guarantee durability and functionality. Consider the ideal workbench height for your comfort, allowing you to work efficiently without straining your back.
Here are some tips for setting up your workbench:
- Tool Storage: Use drawers or pegboards to keep tools easily accessible.
- Workspace Organization: Keep frequently used items within arm’s reach.
- Clamp Availability: Confirm you have multiple clamps for various projects.
- Lighting: Install adequate lighting to enhance visibility and precision.
Creating a Functional Layout
To create a functional layout in your gazebo, start by designating specific work zones for different tasks, like cutting, sanding, and assembling. This organization helps keep everyone focused and efficient. Next, optimize tool placement by positioning frequently used tools within easy reach to streamline workflow and minimize distractions. Additionally, consider incorporating adequate shade to ensure comfort during long working sessions in your gazebo.
Designate Work Zones
Designating work zones is essential for an efficient woodworking class setup. By creating specific areas, you’ll enhance workflow efficiency and guarantee that each participant knows where to go and what to do. Here are some zones to take into account:
- Cutting Zone: For all cutting tasks with saws and hand tools.
- Assembly Zone: A space for putting projects together, equipped with clamps and fasteners.
- Finishing Zone: Dedicated to sanding, painting, or staining projects, keeping mess contained.
- Storage Zone: For tools, materials, and safety gear, making sure everything’s organized and easy to access.
Optimize Tool Placement
Once you’ve established clear work zones, the next step is optimizing tool placement to enhance the functionality of your woodworking class. Start by ensuring tool accessibility; place frequently used tools within arm’s reach in each work zone. This minimizes unnecessary movement, allowing you to focus on your craft.
Consider an ergonomic arrangement as well. Position heavier tools at waist level and lighter ones higher up, promoting comfort and reducing strain. Use pegboards or tool racks to keep everything organized and visible.
Don’t forget about workspace flow; arrange tools to create a natural path between stations. This layout not only fosters creativity but also encourages collaboration among participants, giving everyone the freedom to explore their woodworking skills.
Ensuring Proper Lighting
While you may be enthusiastic to immerse yourself in woodworking classes, ensuring proper lighting in your gazebo is essential for both safety and quality of work. You should aim to balance natural light with artificial lighting to create the perfect workspace. Here are some practical tips to help you achieve that:
- Position your gazebo to maximize exposure to sunlight during the day.
- Install LED lights or fluorescent fixtures for evening sessions.
- Use task lighting at workstations for detailed projects.
- Consider dimmers for adjustable brightness to suit various tasks.
Additionally, incorporating energy-efficient lighting options can help reduce your overall energy consumption while providing adequate illumination.
With the right lighting setup, you’ll not only enhance your creativity but also make your woodworking experience safer and more enjoyable.
Maximizing Ventilation
To create a comfortable and safe woodworking environment, it’s essential to prioritize proper ventilation in your gazebo. Start by utilizing airflow techniques like strategically placing windows or vents that encourage cross-ventilation. This will help maintain fresh air circulation while reducing dust buildup. Consider adding a fan to improve airflow, especially during hot days.
For effective humidity control, you might want to use a dehumidifier if your area tends to be damp. This will prevent moisture-related issues that can affect your materials and tools. Additionally, ensure that your gazebo uses weather-resistant materials to enhance durability and protect against outdoor elements. Ultimately, keep your workspace tidy and organized to allow for natural airflow, enhancing both comfort and safety. By focusing on these aspects, you’ll foster an inviting atmosphere for your woodworking classes.
Incorporating Storage Solutions
Although you may have limited space in your gazebo, incorporating effective storage solutions is essential for keeping your woodworking area organized and functional. Here are some organization strategies that can help:
Maximize your gazebo’s potential with smart storage solutions to ensure an organized and functional woodworking space.
- Wall-mounted shelves: Utilize vertical space by installing shelves for tools and materials.
- Storage bins: Use clear bins to categorize and store smaller items, making them easy to find.
- Magnetic strips: Attach these to walls for hanging metal tools like chisels and screwdrivers.
- Rolling carts: Invest in a rolling cart to move supplies easily and keep your workspace flexible. Additionally, considering regular inspections of your storage solutions will help ensure their longevity and functionality.
Safety Considerations in Your Workspace
Ensuring a safe workspace in your gazebo is essential, especially when teaching woodworking classes. Start by implementing fire safety measures—keep a fire extinguisher nearby and regularly inspect your tools and equipment for any hazards. Make sure your workspace is well-ventilated to avoid inhaling harmful fumes from paints or finishes. Additionally, have a first aid kit readily available, stocked with essentials like band-aids, antiseptics, and gauze. Familiarize yourself and your students with its location and contents. Clear away any clutter that could lead to trips and falls, and encourage everyone to wear appropriate safety gear, including goggles and gloves. By creating this safe environment, you empower your students to focus on their projects without unnecessary worry. Furthermore, always remember to regularly inspect the gazebo for signs of wear and tear to ensure safety during classes.
Personalizing Your Workshop Space
Creating a personalized workshop space in your gazebo can greatly enhance the learning experience for your woodworking classes. By focusing on custom decor and improving your workshop aesthetics, you’ll foster a creative environment. Here are some practical ideas to get you started:
- Incorporate personal artwork that inspires you and reflects your personality.
- Choose a cohesive color scheme for your tools, materials, and decor to create a harmonious look.
- Add functional decorations, like shelving or pegboards, that also serve as display areas for your projects.
- Use comfortable seating that suits your style and provides a welcoming atmosphere for students.
Additionally, consider adding lighting options to enhance the overall decor and atmosphere of your workshop. These personal touches will not only make your space unique but also encourage creativity and learning. Enjoy crafting your ideal workshop!
Frequently Asked Questions
What Is the Best Weatherproofing for a Woodworking Gazebo?
For the best weatherproofing, consider using waterproof coatings like marine varnish. Pair that with durable materials such as treated wood or composite decking. This combo’ll protect your gazebo from moisture and extend its lifespan considerably.
How Can I Insulate My Gazebo for Year-Round Use?
To insulate your gazebo for year-round comfort, consider using insulation techniques like foam boards, spray foam, or insulated curtains. Seal gaps and guarantee proper ventilation to create a cozy, functional space regardless of the season.
What Flooring Options Are Best for a Woodworking Gazebo?
Think of your gazebo as a blank canvas. For woodworking, consider wood flooring for warmth and aesthetic, or a concrete slab for durability and easy maintenance. Choose what fits your creative spirit best!
How Do I Handle Noise From Woodworking Tools in a Gazebo?
To handle noise from woodworking tools in your gazebo, consider using soundproofing materials like acoustic panels and installing noise barriers. These solutions can greatly reduce sound transmission, allowing you to work without disturbing your surroundings.
Can I Run Electricity to My Gazebo for Power Tools?
Yes, you can run electricity to your gazebo. Just guarantee you follow electrical safety guidelines and use an outdoor extension cord rated for the load. It’ll provide power without compromising your freedom to create.