To set up lighting for photography in your gazebo, first, observe natural light conditions. Choose the best time of day, like the golden hour, for soft light. Utilize reflectors to enhance and diffuse light, softening harsh shadows. Incorporating adjustable artificial lighting, like LED softboxes, can help balance evening shoots. Experiment with color gels to create mood and adjust subject positioning for ideal light. Exploring shadows and highlights further can elevate your photography.
Understanding Natural Light Conditions
When you’re working with natural light, understanding its conditions is essential for capturing the best images. The quality of natural light changes throughout the day, influencing your photos’ contrast and color. For ideal results, pay attention to light diffusion, which occurs when light scatters. Soft, diffused light, often found during overcast days or in shaded areas, minimizes harsh shadows and creates a pleasing effect. On sunny days, consider using reflectors or diffusers to soften direct sunlight, ensuring your subjects are evenly lit. Observe how the light interacts with your surroundings, as this can dramatically alter the mood of your photographs. By mastering these natural light conditions, you’ll gain the freedom to create stunning images effortlessly.
Choosing the Right Time of Day for Your Shoot
When planning your shoot, consider the time of day carefully, as it greatly affects your lighting conditions. The golden hour offers soft, warm light that enhances your images, while midday can create harsh shadows that may detract from your subject. Additionally, weather conditions can impact light quality, so always check forecasts before heading out.
Golden Hour Benefits
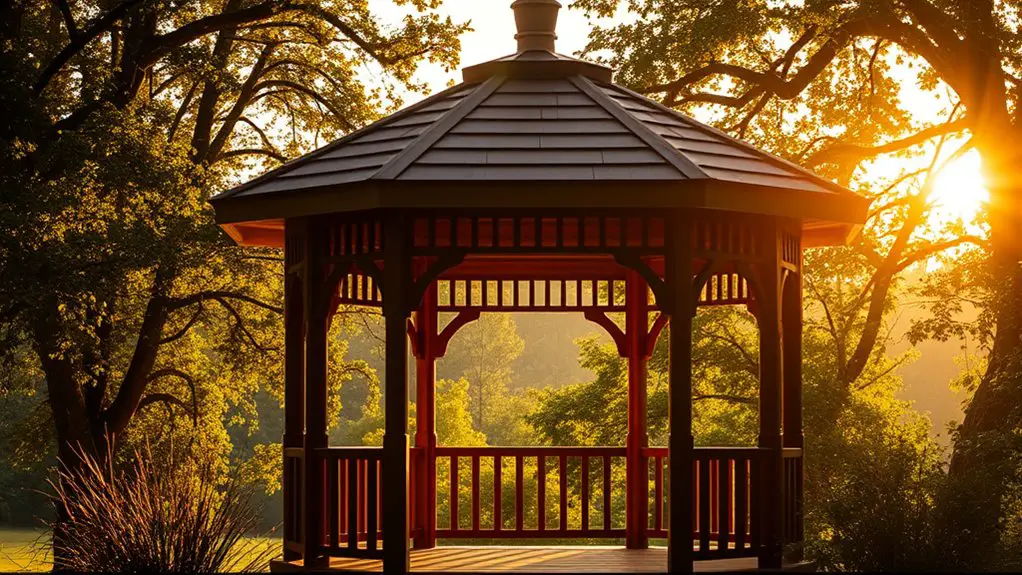
Although many photographers often overlook the time of day, shooting during the golden hour can greatly enhance the quality of your images. This period, shortly after sunrise or before sunset, offers a unique opportunity to capture soft lighting that bathes your subjects in warmth. The diffuse light minimizes harsh shadows, creating a more flattering appearance.
| Time of Day | Lighting Quality |
|---|---|
| Golden Hour | Soft, warm lighting |
| Midday | Harsh, contrasty light |
| Early Morning | Crisp, clear light |
| Late Afternoon | Rich, golden tones |
Midday Shadows Challenges
While golden hour offers stunning lighting opportunities, midday presents its own set of challenges. The harsh overhead sun creates strong shadows that can distort your subjects and detract from the overall image quality. To combat this, you’ll need effective midday light management strategies. Implement shadow diffusion techniques, such as using reflectors or diffusers, to soften these shadows and create a more flattering light. Position your subjects in shaded areas whenever possible, or consider using your gazebo’s structure to shield them from direct sunlight. Remember, controlling the light is key to achieving the desired effect in your photos. By mastering these techniques, you can transform the midday sun from a hurdle into a powerful tool in your photography arsenal.
Weather Considerations Impact
Choosing the right time of day for your shoot is essential, especially since weather conditions can dramatically influence the quality of your images. Understanding local weather patterns is vital for effective lighting adjustments. Here are three key considerations:
- Golden Hour: Shoot during the hour after sunrise or before sunset for soft, warm light.
- Overcast Days: Utilize diffused light from clouds to minimize harsh shadows, creating even exposure.
- Windy Conditions: Be cautious of moving foliage that can disrupt your lighting setup or create unwanted shadows.
Utilizing Reflectors for Enhanced Lighting
Utilizing reflectors can greatly enhance your photography by controlling and redirecting light. There are various reflector types available, such as silver, gold, white, and translucent, each providing different effects. Silver reflectors create a strong, focused bounce, while gold adds warmth, ideal for golden hour shots. White reflectors offer a softer light, perfect for portraits, and translucent materials can diffuse harsh sunlight.
To maximize the impact of these tools, mastering bounce techniques is essential. Position your reflector at an angle that captures and redirects sunlight onto your subject, reducing shadows and enhancing details. Experiment with distances and angles to find the best setup for your specific scene. This simple addition can elevate your images, creating a professional touch without the need for complex setups.
Incorporating Artificial Lighting Options
When incorporating artificial lighting options, it’s essential to understand the different types of lights available, such as LED, softboxes, and strobes. Each type offers unique characteristics that can dramatically affect your images. Additionally, effective light placement strategies will help you achieve the desired mood and highlight your subject appropriately.
Types of Artificial Lights
Although various artificial lighting options exist, understanding the different types can greatly enhance your photography. Here are three popular choices:
- LED Options: These lights are energy-efficient and versatile. They offer adjustable color temperatures, making it easy to match your desired ambiance.
- Softbox Effects: Softboxes diffuse light evenly, reducing harsh shadows. They’re ideal for portrait photography, creating a flattering, soft glow on your subjects.
- Continuous Lighting: This type provides a constant light source, allowing you to see how shadows and highlights play out in real-time. It’s particularly useful for video work or when you want to maintain a consistent look.
Light Placement Strategies
To effectively set up your lighting for photography, understanding the placement of artificial lights is essential, as it can dramatically influence the mood and quality of your images. Start by evaluating the desired light intensity; brighter lights can create a more dynamic atmosphere but may require careful control to avoid harsh shadows. Position your lights at 45-degree angles to your subject for a balanced effect. For softer shadows, utilize light diffusion techniques, such as softboxes or umbrellas, to spread the light evenly. Consider adding background lights to enhance depth and dimension, ensuring they complement the main light source. Experiment with these placements to discover what works best for your unique gazebo environment, allowing for creative freedom in your photography.
Creative Use of Color Gels and Filters
While many photographers focus solely on natural light or standard white balance, incorporating color gels and filters into your lighting setup can dramatically enhance your images. Experimenting with creative color combinations can evoke different moods and highlight specific elements in your scene. Here are some effective gel application techniques to take into account:
- Complementary Colors: Use gels that contrast your subject’s hues to bring out details.
- Layering Gels: Stack multiple gels to create unique shades and effects.
- Neutral Density Filters: Control light intensity without affecting color, allowing for longer exposures.
Positioning Your Subject for Optimal Light
How can you guarantee your subject is perfectly lit? Start with strategic subject positioning. Place your subject facing the light source to enhance natural illumination, but consider the light angles too. Soft, diffused light works best, so position your subject at a 45-degree angle to the light for a flattering effect. This minimizes harsh shadows while accentuating features. If you’re using artificial lights, adjust their placement; a key light slightly above eye level can create depth. Experiment with backlighting for a dramatic effect, but make sure you have a fill light to maintain detail. Always be aware of how your subject interacts with the light, as minor adjustments can dramatically improve the overall quality of your photographs.
Experimenting With Shadows and Highlights
Even though achieving the perfect exposure is essential, experimenting with shadows and highlights can elevate your photography considerably. Utilizing shadow play and highlight control allows you to create depth and drama in your images. Here are three techniques to evaluate:
- Backlighting: Position your subject in front of a light source to create silhouettes and striking contrasts.
- Diffusion: Use softboxes or reflectors to diffuse harsh light and soften shadows, enhancing the overall tone of your photos.
- Angle Variation: Change your shooting angle to explore how shadows fall and highlights appear, adding intrigue to your composition.
Frequently Asked Questions
What Type of Light Bulbs Work Best for Artificial Lighting in a Gazebo?
Think of light bulbs as the stars in your gazebo’s night sky. For artificial lighting, LED options shine brightly with adjustable bulb brightness, ensuring your space is well-lit while conserving energy. Choose wisely for stunning effects.
How Can I Prevent Harsh Shadows When Shooting in My Gazebo?
To prevent harsh shadows, you can use shadow diffusion techniques like softboxes or sheer fabrics. Additionally, bounce light options, such as reflectors, help soften and distribute light evenly, creating a more flattering photographic environment.
Can I Use My Smartphone for Lighting Setup in a Gazebo?
Your smartphone’s lighting capabilities can be astonishing! Using smartphone techniques and lighting apps, you can effectively create ambient or focused light, ensuring your gazebo shots are vibrant and shadow-free, giving you the freedom to explore creativity.
What Is the Best Way to Secure Lights in an Outdoor Gazebo?
To secure lights in an outdoor gazebo, focus on strategic light placement. Use securing techniques like clamps, zip ties, or hooks to guarantee stability, allowing for creativity while maintaining safety and preventing light fixtures from shifting.
How Do Weather Conditions Affect My Lighting Setup in a Gazebo?
When it rains cats and dogs, you’ll notice weather impacts your lighting setup markedly. Be ready to make lighting adjustments; overcast skies can soften shadows, while strong winds might require securing your lights more effectively.