Have you ever wondered how much noise could be reduced simply by upgrading your doors? Installing insulated sound doors can greatly enhance your space’s tranquility and energy efficiency. By understanding the benefits, selecting the right materials, and following a precise installation process, you can achieve ideal soundproofing. Let’s explore the key steps to guarantee your project is successful and effective.
Understanding the Benefits of Insulated Sound Doors
When you consider soundproofing solutions, insulated sound doors stand out for their effectiveness in reducing noise transfer. These doors markedly enhance acoustic performance, creating a quieter environment by minimizing sound leakage between spaces. Their robust construction often includes multiple layers of insulation, which not only dampens noise but also improves energy efficiency. By preventing drafts and maintaining temperature, insulated sound doors contribute to lower energy costs, making them a smart investment for both residential and commercial settings. Installing these doors allows you to enjoy a more peaceful atmosphere while promoting sustainability through energy savings. Ultimately, choosing insulated sound doors means you’re prioritizing comfort and efficiency, providing the freedom to focus without disruptive sounds interfering.
Choosing the Right Soundproof Door
Selecting the right soundproof door is essential for maximizing the acoustical benefits of your space. Start by considering door materials; solid wood and metal doors generally offer superior sound insulation compared to hollow-core options. Look for doors specifically designed for soundproofing, as they often contain dense cores that effectively dampen noise. Pay attention to sound ratings, commonly expressed in STC (Sound Transmission Class) values, which indicate a door’s ability to block sound. Aim for a door with an STC rating of at least 30 to guarantee effective noise reduction. Additionally, check for proper sealing and installation specifications to enhance performance. By carefully evaluating materials and sound ratings, you can guarantee your soundproof door meets your needs for tranquility and freedom.
Preparing for Installation
Preparation is key to a successful installation of insulated sound doors. Start by measuring doorframe dimensions accurately; this guarantees a proper fit and ideal soundproofing performance. Use a level to check for any irregularities that might affect the door’s alignment. Next, assess soundproofing needs based on the specific environment. Consider factors like existing noise levels and the type of sound you want to mitigate. This assessment will guide your choice of materials and door specifications. Make certain to gather all necessary tools and supplies before starting the installation process. Having everything on hand will streamline your efforts and reduce frustration. With careful preparation, you’ll set the stage for a smooth installation of your insulated sound doors.
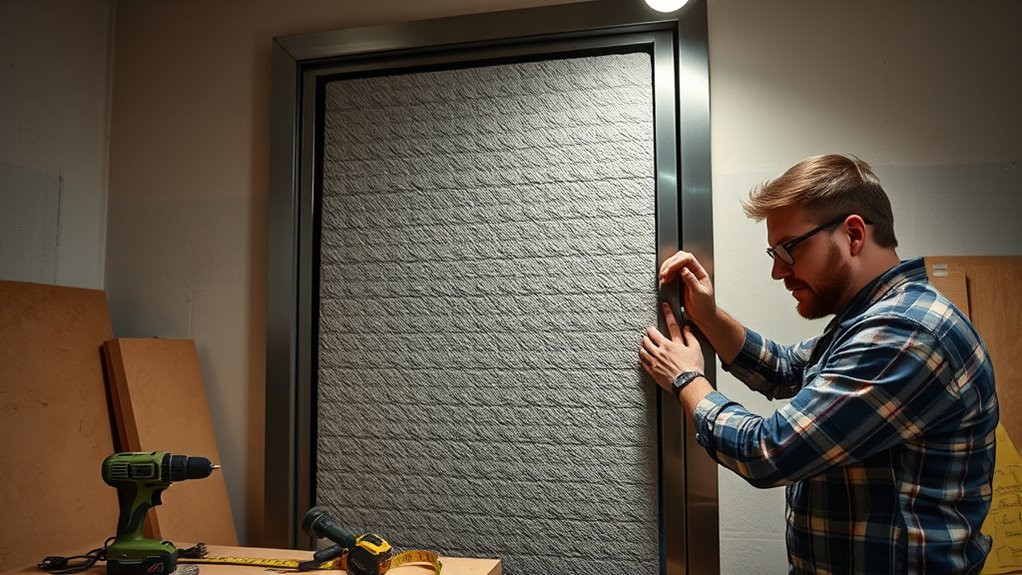
Step-by-Step Installation Process
1. To install insulated sound doors, start by measuring doorframe dimensions carefully. You’ll want to verify a snug fit for maximum soundproofing. Next, select insulation materials based on your soundproofing needs; options include foam, fiberglass, or mass-loaded vinyl. Once you have your materials, remove the existing door and frame. Install a sound-dampening threshold if necessary, then position the new door in the frame. Secure it with hinges, making sure it swings freely without obstruction. Finally, seal any gaps with weatherstripping to enhance insulation effectiveness. Check that the door closes securely, verifying minimal sound leakage. Following these steps will create an environment that fosters peace and tranquility while maintaining your desired freedom from noise.
Maintenance and Care for Sound Doors
Although sound doors are designed for durability, regular maintenance is essential to confirm they continue to perform effectively. Start by conducting door inspections at least twice a year. Check for signs of wear, such as cracked seals or loose hardware. Address any issues promptly to maintain soundproofing performance.
For cleaning, use gentle cleaning techniques that won’t damage the door’s surface. A soft cloth with mild soap and water works well; avoid harsh chemicals. Verify the seals and gaskets are clean and free from debris, as this affects insulation.
Additionally, lubricate hinges and check for alignment. By following these maintenance practices, you’ll extend the life of your sound doors and confirm they provide the peace and quiet you desire.
Frequently Asked Questions
Can I Install Insulated Sound Doors Myself or Hire a Professional?
You can definitely opt for DIY installation if you’re handy, but hiring a professional installation guarantees precision and peak performance. Weigh your skills against the project’s complexity to make the best choice for your needs.
What Materials Are Insulated Sound Doors Made From?
Insulated sound doors typically consist of dense core materials, resilient soundproofing layers, and durable outer finishes. Their material composition greatly enhances soundproofing effectiveness, ensuring you achieve the desired acoustic control and peace in your space.
How Much Do Insulated Sound Doors Typically Cost?
Insulated sound doors typically range from $200 to $1,000, depending on materials and features. For effective cost comparison, you’ll want to factor in your budget considerations, ensuring they meet your specific soundproofing needs.
Do Insulated Sound Doors Require Special Hardware?
Yes, insulated sound doors often require specialized door hardware for proper installation. Have you considered how the right hardware can enhance soundproofing? Make certain you meet installation requirements for peak performance and durability in your space.
Can Insulated Sound Doors Be Painted or Stained?
Yes, insulated sound doors can be painted or stained. You’ve got various color options available, and finishing techniques can enhance their appearance. Just make sure you use compatible products to maintain sound insulation properties while achieving your desired look.