Did you know that adding faux stone walls can increase the aesthetic appeal of your gazebo by up to 30%? It’s a practical way to elevate your outdoor space without breaking the bank. By choosing the right materials and techniques, you can create a rustic charm that invites relaxation. But before you start, there are a few essential steps to take into account that will guarantee your project is a success. Let’s explore how to transform your gazebo into a stunning retreat.
Choosing the Right Materials for Faux Stone Walls
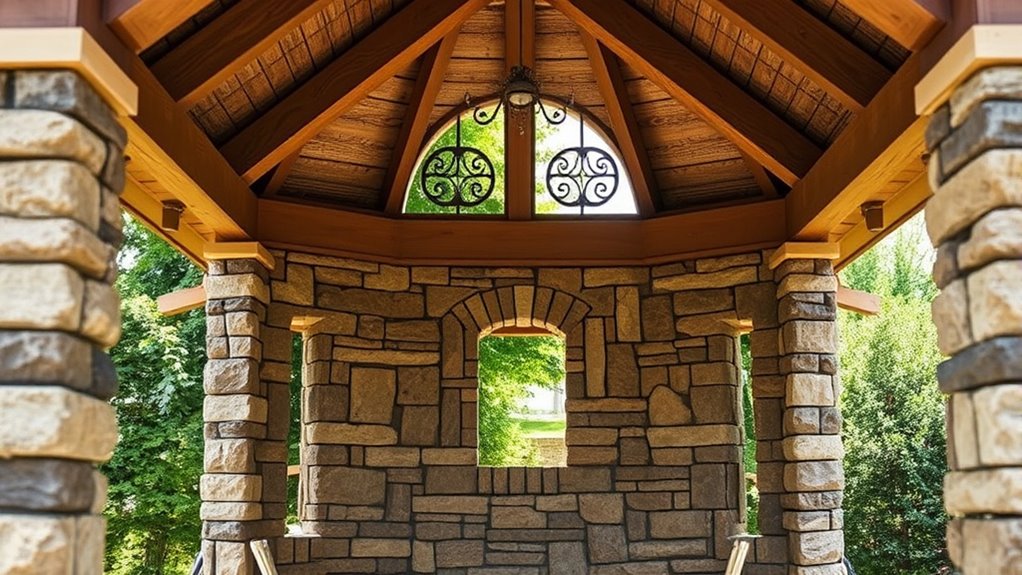
When it comes to creating a stunning faux stone wall, selecting the right materials is essential for achieving a realistic look. You’ve got various faux stone options to choose from, including panels, veneers, or even paint techniques. Consider the texture selection carefully—smooth finishes can offer a modern vibe, while rough-hewn surfaces evoke rustic charm. Think about the color palette, too; earth tones often enhance authenticity. Don’t forget to factor in durability and maintenance, ensuring your chosen materials can withstand the test of time. With the right materials, you’ll enjoy a beautiful, freedom-filled space that reflects your unique style.
Preparing Your Gazebo for Installation
Before diving into the installation of your faux stone wall, it’s essential to prepare your gazebo properly to confirm a seamless process. Start by following this pre-installation checklist to confirm your workspace organization is on point:
| Task | Status |
|---|---|
| Clear the gazebo interior | [ ] |
| Gather tools & materials | [ ] |
| Check for structural issues | [ ] |
| Measure wall dimensions | [ ] |
Step-by-Step Guide to Creating Faux Stone Walls
Creating faux stone walls can transform your gazebo into a stunning focal point with minimal effort. Start by selecting your preferred color palette; earthy tones often work best. Next, choose your faux stone techniques, like sponge painting or stenciling, to achieve the desired texture. Prepare your walls by cleaning and priming them for better adhesion. Once prepped, apply the base coat and let it dry completely. Then, using your chosen technique, apply the stone effect, layering colors to create depth. Finally, seal your masterpiece to protect it. Enjoy your beautiful faux stone walls that’ll elevate your outdoor space!
Adding Finishing Touches and Detailing
As you step back to admire your newly painted faux stone walls, don’t forget that the finishing touches can elevate the overall look even further. Consider these finishing techniques and decorative accents to enhance your space:
- Trim and Molding: Add decorative molding around windows and edges to frame your faux stone beautifully.
- Accent Lighting: Install soft lighting to highlight the texture of the faux stone, creating a warm ambiance.
- Wall Art: Incorporate framed art or wooden shelves to break up the wall and introduce personal flair.
These elements can transform your gazebo’s interior into a sophisticated retreat.
Maintenance Tips for Your Faux Stone Walls
Maintaining the beauty of your faux stone walls is essential for keeping your space looking new and inviting. Regular cleaning techniques, like using a soft cloth and mild detergent, can help remove dirt and dust. For tougher stains, a gentle scrub with a non-abrasive cleaner is ideal. Don’t forget to check for any signs of damage; small cracks can be fixed with a bit of caulk or paint. Here’s a quick reference table to help you keep your walls in top shape:
| Task | Frequency | Tips |
|---|---|---|
| Dusting | Weekly | Use a microfiber cloth |
| Deep Cleaning | Monthly | Mild detergent, soft brush |
| Damage Inspection | Quarterly | Look for cracks or chips |
| Repair | As needed | Use caulk for small cracks |
| Revitalizing Finish | Yearly | Repaint or seal if necessary |
Frequently Asked Questions
Can I Use Real Stone Instead of Faux Stone?
Yes, you can use real stone instead of faux stone. About 70% of homeowners prefer real stone for its durability and natural beauty, despite the higher cost compared to faux stone’s lighter, more versatile options.
What Tools Do I Need for This Project?
For this project, you’ll need a level, utility knife, adhesive, trowel, and a saw. Tool selection is key for smooth installation; these essentials guarantee your faux stone walls look stunning and stand the test of time.
How Long Does the Installation Process Take?
You’ll find the installation timeline for your project’s duration varies, typically spanning a weekend. With patience and creativity, you’ll transform your space into a stunning retreat, where nature and craftsmanship harmoniously intertwine. Enjoy the journey!
Can Faux Stone Walls Be Painted Later?
Yes, you can paint faux stone walls later. Just guarantee you use appropriate painting techniques to maintain their durability. This way, you can refresh the look while enjoying the freedom of customization in your space.
Are There Any Safety Precautions to Consider During Installation?
While you’re enthusiastic to create, don’t forget safety gear—gloves, goggles, and masks. Guarantee proper ventilation too; it keeps you safe from dust and fumes. Your freedom to create shouldn’t come at the cost of your health.