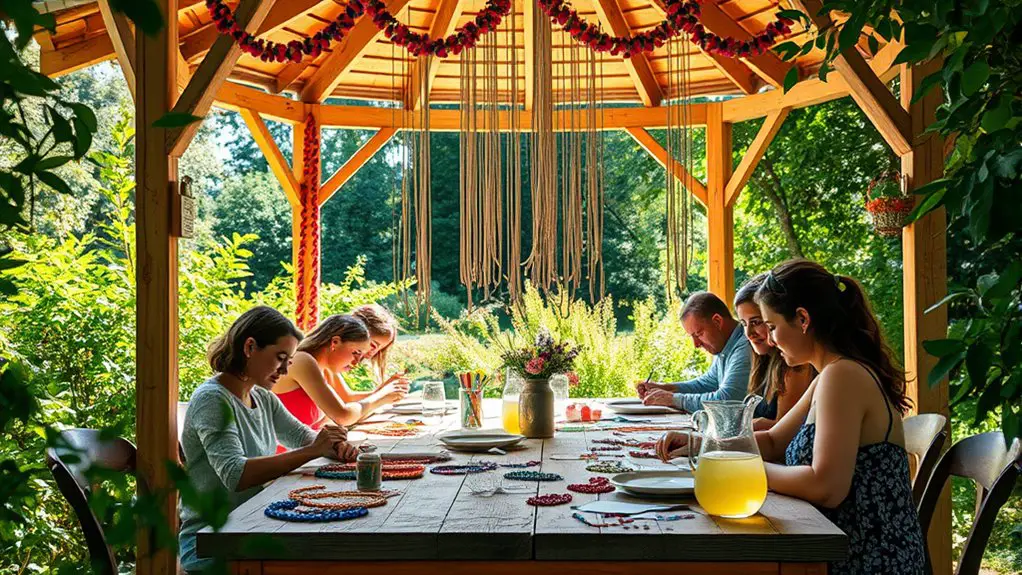
Hosting a DIY jewelry-making class in your gazebo creates a vibrant atmosphere for creativity. Start by gathering supplies, like diverse beads and tools, and set up a cozy workspace with comfortable seating and soft lighting. Invite friends with engaging invitations and provide snacks to enhance the experience. Plan projects to suit various skill levels and encourage personal expression. As you craft together, share ideas and celebrate finished creations. You’ll discover even more tips to elevate your event.
Choosing the Right Supplies for Your Jewelry-Making Class
When starting your DIY jewelry-making journey, selecting the right supplies is essential to your success and enjoyment. Begin with your bead selection; it’s where your creativity shines. Choose beads that resonate with your style—think colors, shapes, and materials. Don’t hesitate to mix glass, wood, or metal for a unique flair.
Next, consider your tool options. Basic tools like pliers, wire cutters, and a bead mat are must-haves. You might also want to explore specialty tools like crimping pliers if you plan on working with finer materials or intricate designs. Investing in quality tools can make a significant difference in your crafting experience.
Finally, don’t forget to gather additional supplies like strings and clasps. With the right beads and tools at your disposal, you’ll set the stage for a fulfilling creative adventure that reflects your personal style. Enjoy the freedom of creating beautiful pieces!
Setting Up Your Gazebo for a Creative Atmosphere
To create a vibrant and inviting atmosphere in your gazebo, start by choosing a cohesive color scheme that reflects your creative spirit. Next, arrange comfortable seating that encourages relaxation and interaction among participants. With these elements in place, you’ll set the perfect stage for your jewelry-making class to flourish. Additionally, consider incorporating outdoor lighting options to enhance the ambiance and make the space feel warm and welcoming.
Choose a Color Scheme
How can you transform your gazebo into an inviting space for creativity? Choosing the right color scheme can set the tone for your DIY jewelry-making class. Consider color psychology—warm colors like reds and oranges can energize, while cool colors like blues and greens promote calmness. You might also want to reflect seasonal themes; soft pastels for spring, vibrant hues for summer, rich tones for autumn, and cool shades for winter.
Here’s a simple table to help you decide:
| Color | Emotion | Seasonal Theme |
|---|---|---|
| Red | Energizing | Summer |
| Blue | Calming | Winter |
| Green | Revitalizing | Spring |
Use these insights to create an inspiring atmosphere!
Arrange Comfortable Seating
Creating a cozy and inviting atmosphere in your gazebo is essential for a successful DIY jewelry-making class, so arranging comfortable seating should be a top priority. Start by selecting seating arrangements that encourage interaction and creativity, like a circular setup or cozy clusters. Opt for chairs or benches with plush outdoor cushions to guarantee everyone feels at ease. Consider adding a few throw blankets for extra comfort, especially if the weather turns cool. You might also include small side tables for participants to set their tools and materials. By thoughtfully arranging your seating, you’ll create a welcoming environment where everyone can express their creativity freely and comfortably while making beautiful jewelry together.
Inviting Guests and Creating a Comfortable Environment
A warm and inviting atmosphere can make all the difference when hosting a DIY jewelry-making class. Start by crafting an engaging invitation design that reflects the creative spirit of your event. Use vibrant colors and playful fonts to entice your guests, ensuring they’re enthusiastic to participate. Curate your guest list carefully; invite friends who share a passion for crafting and those who are keen to learn.
On the day of the class, create a cozy environment in your gazebo. Soft lighting, perhaps with solar chandeliers, can enhance the ambiance. Provide refreshments to keep everyone energized—think herbal teas and light snacks. Arrange your seating to encourage conversation and collaboration, allowing guests to mingle and share ideas. With thoughtful touches, you’ll set the stage for a memorable, enjoyable experience that inspires creativity and connection among your guests.
Planning the Jewelry-Making Projects
While planning your jewelry-making projects, it’s essential to take into account the skill levels and interests of your guests to guarantee everyone feels engaged and challenged. Start by selecting a few jewelry themes that resonate with your guests, like bohemian, minimalist, or nature-inspired designs. This will inspire creativity and excitement.
Next, balance project difficulty. Consider offering a range of options: simple beaded bracelets for beginners, while providing more intricate designs, like wire-wrapped pendants, for the more experienced. This way, everyone can choose a project that suits their skill level, ensuring an inclusive atmosphere.
Don’t forget to gather all necessary materials, and prep kits in advance. Encourage guests to express their individuality, whether by choosing colors, beads, or charms. By thoughtfully planning your projects, you’ll create a memorable experience where everyone leaves with a piece of jewelry that reflects their unique style.
Step-by-Step Instructions for Beginners
Before diving into your jewelry-making project, it’s important to gather all the necessary tools and materials to guarantee a smooth experience. Start with a wire cutter, pliers, beads, and jewelry wire. Once you have everything ready, choose a simple design to kick off your creativity.
Begin by threading beads onto the wire using basic beading techniques. Experiment with different colors and shapes to see what resonates with you. Next, cut the wire to your desired length, leaving extra for finishing.
For wire wrapping, create loops at both ends of your beaded strand to secure your design. Practice twisting the wire around itself to form a tight hold.
Finally, attach a clasp to complete your piece. Don’t forget to admire your handiwork! With these steps, you’ll not only have a beautiful piece of jewelry but also the confidence to explore more advanced techniques. Enjoy the freedom of creating!
Encouraging Creativity and Personal Expression
Creating your first piece of jewelry is just the beginning of an exciting journey into personal expression and creativity. As you explore different materials, colors, and techniques, let artistic inspiration flow freely. Don’t be afraid to experiment with unique combinations; it’s all part of the process.
Consider what represents you—your style, your story, your vibe. Each bead or charm you choose can reflect your personality and emotions. Allow yourself the freedom to play; there are no strict rules in jewelry-making.
Embrace your individuality; let each bead and charm tell your unique story in the art of jewelry-making.
When you embrace self-expression, your creations will resonate more deeply, becoming extensions of who you are. Share your thoughts and ideas with fellow participants. Encourage each other to think outside the box, and celebrate your differences.
Ultimately, this class is about tapping into your creativity, making pieces that are truly one-of-a-kind, and reveling in the joy of crafting something special that’s uniquely yours.
Showcasing and Sharing Finished Creations
Once you’ve crafted your jewelry pieces, showcasing and sharing them with others can be just as rewarding as the making process itself. Organize a “show and tell” session in your gazebo, inviting friends to discover your creative showcases. Set up a beautiful display that highlights your unique designs, using natural elements like flowers or greenery for an inviting atmosphere.
Encourage your guests to share their own creations, fostering a community of creativity. Consider offering small prizes for various categories, like the most imaginative design or the best use of color. This not only adds excitement but also inspires everyone to think outside the box. Capture the moments by taking photos, allowing you to savor the memories and share them online.
Frequently Asked Questions
What Age Group Is Suitable for a DIY Jewelry-Making Class?
When it comes to age considerations for a DIY jewelry-making class, think of it like a rainbow—there’s something for everyone! Generally, kids aged 8 and up can enjoy various skill levels with guidance.
How Long Should the Jewelry-Making Class Last?
For ideal participant engagement, a jewelry-making class should last around two to three hours. This duration allows you to explore techniques while giving everyone enough time to create their unique pieces without feeling rushed.
Can I Host the Class in My Backyard Instead of a Gazebo?
Absolutely, you can host the class in your backyard. Just make sure your setup’s comfortable, and consider the weather—having a backup plan for rain or strong sun can keep everyone happy and engaged during the class.
What if Someone Has Allergies to Certain Jewelry Materials?
If someone has allergies to certain materials, it’s essential to communicate with participants beforehand. Consider using allergy-friendly materials and encourage open discussions to guarantee everyone feels comfortable and enjoys the creative experience without concern.
How Do I Handle Cleanup After the Class?
For effective cleanup, gather your cleanup supplies, organize your workspace, and follow these cleanup tips: guarantee all materials are collected, dispose of waste properly, and wipe surfaces to leave everything neat and tidy for next time.