Hosting a terrarium-making workshop in your gazebo can be a delightful experience. Choose a mild spring or fall weekend for ideal comfort, and gather essential supplies like glass containers, potting soil, and colorful plants. Create eye-catching invitations and arrange the gazebo to promote conversation with cozy seating. Provide step-by-step instructions while encouraging personal creativity. Finally, set up a display area to showcase everyone’s unique creations. You’ll discover tips and ideas to enhance your workshop even further.
Choosing the Right Date and Time
When’s the best time to hold your terrarium-making workshop? To answer that, you’ll need to reflect on a couple of key factors: weather considerations and guest availability. Ideally, aim for a day when the weather’s mild, allowing guests to enjoy the outdoor ambiance of your gazebo. Spring and early fall typically offer pleasant temperatures, making them prime seasons for your event.
You’ll also want to check your guests’ schedules. Poll your potential attendees to find a date that suits most. Think weekends or evenings when people are more relaxed and free to explore their creative sides.
Lastly, don’t forget about local events that might clash with your workshop. By thoughtfully selecting a date and time, you’ll create an inviting atmosphere, encouraging everyone to release their creativity and connect with nature while crafting their own unique terrariums.
Gathering Materials and Supplies
To create your perfect terrarium, you’ll need some essential supplies like a glass container, potting soil, and a variety of plants. Don’t forget to gather additional decorative elements, such as stones, figurines, or moss, to add your personal touch. With these materials in hand, you’re ready to bring your miniature ecosystem to life!
Essential Terrarium Supplies
Creating a stunning terrarium requires a handful of essential supplies that set the foundation for your mini ecosystem. Start with a clear glass container to showcase your design, followed by a drainage layer, typically pebbles or activated charcoal, to guarantee proper moisture control. For plant selection, choose small, compatible species that thrive in similar conditions. Finally, don’t forget potting soil and decorative elements like moss. Here’s a quick overview of what you’ll need:
| Supply | Purpose |
|---|---|
| Glass container | Houses the terrarium |
| Pebbles/Charcoal | Provides drainage |
| Potting soil | Supports plant growth |
| Plants | Your living décor |
| Tools (tweezers) | Helps with terrarium care |
With these supplies, you’re ready to create your own vibrant oasis!
Additional Decorative Elements
Enhancing your terrarium with additional decorative elements can elevate its aesthetic appeal and create a personalized touch. Start by gathering decorative stones in various shapes and colors. These will not only add texture but also define different areas within your terrarium. Think about incorporating themed figurines that reflect your personality or interests, whether it’s tiny animals, miniature fairies, or even whimsical structures. These elements can serve as focal points, sparking joy and creativity. Don’t shy away from experimenting with layouts; rearranging stones and figurines can bring new life to your design. Remember, the beauty of your terrarium lies in its individuality, so let your imagination run wild as you curate these special touches!
Inviting Your Guests
How can you make your terrarium-making workshop an unforgettable experience for your guests? Start with a carefully curated guest list that reflects the vibrant personalities you want to invite. Think about friends, family, and coworkers who’d enjoy a creative escape in your gazebo. Next, focus on your invitation design. Craft an eye-catching, whimsical invitation that captures the essence of what they’ll be creating. Use bright colors and playful fonts, and consider including a small sneak peek of materials they’ll be working with. You could even ask them to bring a unique container for their terrarium, adding a personal touch. Sending digital invites can keep things eco-friendly, while handwritten notes add a special warmth. Don’t forget to mention any supplies you’ll provide, as well as any refreshments. This thoughtful approach will make your guests feel valued and excited about the workshop ahead.
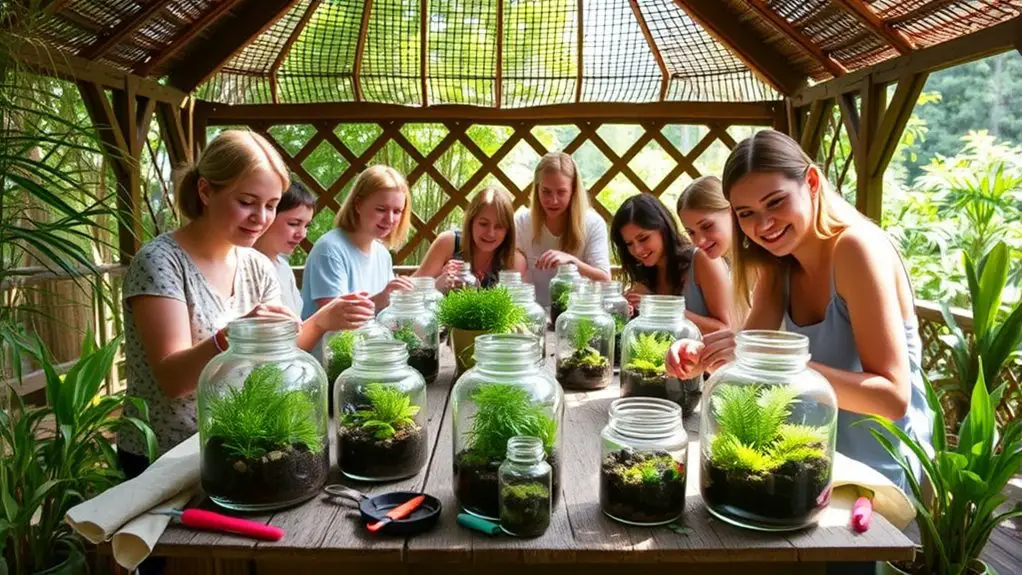
Setting Up Your Gazebo
When setting up your gazebo, start by choosing a location that offers shade and a view, ensuring your guests feel relaxed and inspired. Next, gather essential supplies like terrarium kits, tools, and refreshments to keep everyone engaged. Finally, arrange comfortable seating to foster conversation and creativity as you begin this hands-on journey together. Additionally, consider sun and shade exposure to optimize the comfort of your guests throughout the workshop.
Choose the Right Location
Selecting the perfect location for your gazebo can transform your terrarium-making workshop into an inspiring experience. Start by considering weather considerations—choose a spot that’s sheltered from harsh winds and direct sunlight, guaranteeing a comfortable environment for your guests. You might want to position your gazebo near trees or bushes to provide natural shade.
Next, think about accessibility factors. Verify your gazebo is easily reachable for everyone, including those with mobility challenges. A flat, even surface will make it easier for participants to navigate with supplies.
Gather Essential Supplies
To create an engaging terrarium-making workshop, gathering essential supplies is crucial. Start by selecting various terrarium types, like closed and open designs, to showcase diversity. You’ll need clear glass containers, potting soil, gravel, and activated charcoal to guarantee proper drainage and air circulation.
Next, focus on plant selection. Choose a mix of succulents, ferns, and mosses that thrive in different environments. Make certain you have tools like small shovels, tweezers, and scissors for easy handling. Don’t forget decorative elements, like stones or figurines, to add personal flair. With these supplies in hand, you’re ready to inspire creativity and freedom in your participants as they craft their unique lush worlds!
Arrange Comfortable Seating
How can you create a welcoming atmosphere for your terrarium-making workshop? Start with thoughtful seating arrangements that prioritize comfort factors. Reflect on using a mix of cushioned chairs and benches, allowing participants to choose their preferred style. Arrange seating in a circular or semi-circular formation to foster interaction and collaboration. Don’t forget to provide small side tables for supplies and drinks, adding convenience without cluttering the space. If the weather’s warm, throw in some outdoor cushions for a cozy touch. Be sure to take into account the height of the seating too; it should accommodate everyone comfortably. By creating an inviting setup, you’ll encourage creativity and connection, making your workshop a memorable experience for all involved.
Step-by-Step Terrarium Instructions
While creating a terrarium might seem intimidating at first, it’s actually a straightforward and enjoyable process that you can master with just a few key steps. Begin by selecting a clear glass container to showcase your plants. Next, choose a variety of plants that thrive in similar conditions; consider options like succulents or ferns for a vibrant display.
Start with a layer of small pebbles for drainage, followed by activated charcoal to keep the environment fresh. Add a layer of potting soil, ensuring it’s deep enough to support your selected plants.
Gently plant your chosen greenery, arranging them creatively. Water them lightly, then place your terrarium in a spot where it can enjoy indirect sunlight.
Adding Personal Touches
Once your terrarium is set up and your plants are in place, the fun really begins with adding personal touches that reflect your style and personality. Start by selecting unique plant choices that resonate with you—perhaps a vibrant moss or a quirky succulent that sparks joy. Next, think about personalized decorations; these can be small figurines, stones with special meaning, or even tiny fairy lights to create a whimsical atmosphere.
Consider incorporating natural elements like driftwood or colorful pebbles to enhance the aesthetic. You might also want to add layers of sand or gravel for a textured look that’s as unique as you are. As you play with these elements, let your creativity flow. Remember, your terrarium should be a little world that tells your story, so embrace your freedom to create something truly one-of-a-kind!
Tips for a Successful Workshop
To guarantee your terrarium-making workshop is a hit, start by planning the essentials well in advance. First, promote your event through effective workshop marketing. Utilize social media, local community boards, and word-of-mouth to attract participants enthusiastic to express their creativity.
Next, make sure all supplies are readily available—containers, soil, plants, and decorative elements. When participants arrive, engage them right away with a warm welcome and an overview of what to expect.
Encourage interaction by facilitating discussions about their design ideas and personal touches. This participant engagement not only enhances their experience but fosters a sense of community. Additionally, hosting the workshop in a gazebo can provide outdoor comfort and a beautiful setting that enhances the overall experience.
Lastly, consider offering a small incentive, like a discount on future workshops or a chance to win a plant care kit. By focusing on these elements, you’ll create an inviting atmosphere that inspires creativity and connection among your guests.
Showcasing Finished Terrariums
Showcasing finished terrariums is a rewarding part of the workshop experience, allowing participants to celebrate their creativity. As you gather around the gazebo, each individual can proudly exhibit their unique creations. Encourage everyone to share the inspiration behind their designs. Did they choose specific plants for their colors or textures? This not only fosters a community spirit but also highlights the diverse approaches everyone took.
Set up a designated display area, where each terrarium can shine. Consider adding labels that describe the materials used or the creative process. This adds an educational element, inspiring designs that others may want to replicate.
As participants discuss their creations, you’ll witness the joy of showcasing creativity in action. This moment becomes a celebration of artistry, reminding everyone that there are no rules in terrarium-making—only endless possibilities. By valuing each design, you cultivate an encouraging environment where imagination truly flourishes.
Frequently Asked Questions
What Is the Ideal Number of Participants for a Workshop?
For ideal participant engagement, aim for 6 to 12 attendees. This size allows for meaningful interactions while maintaining an organized workshop layout, ensuring everyone feels included and has space to express their creativity.
How Long Should the Workshop Last?
For effective time management, aim for a workshop duration of 2 to 3 hours. This allows you to cover all aspects while giving participants the freedom to explore their creativity without feeling rushed.
Can Children Participate in the Terrarium-Making Workshop?
Absolutely, kids can plunge into the delightful world of terrarium-making! With kid-friendly materials and fun plant selections, they’ll release their creativity while crafting miniature ecosystems, bringing joy and imagination to life in vibrant ways.
What Should I Do if a Guest Is Allergic to Plants?
If a guest has a plant allergy, you should take precautions by ensuring they’re aware of potential allergens. Offer alternative activities, like creating decorative pots or learning about terrarium design, to keep them engaged and safe.
Is There a Specific Skill Level Required to Join the Workshop?
Whether you’re a budding artist or a seasoned designer, this workshop welcomes all. You’ll explore beginner techniques and advanced designs, crafting your own unique masterpiece. So come release your creativity, no experience needed!