Imagine your gazebo transformed into a stylish retreat, where the outdoors meet comfort in a seamless embrace. A DIY transparent wall makeover not only boosts your gazebo’s appeal but also enhances its functionality. By evaluating its current condition and selecting the right materials, you can create a space that’s inviting year-round. Curious about how to start this transformation? Let’s explore the essential steps to turn your vision into reality.
Assessing Your Gazebo’s Current Condition
Before diving into your DIY transparent wall gazebo makeover, it’s important to assess your gazebo’s current condition. Start with a thorough gazebo inspection, checking for any signs of wear, rot, or damage. Look closely at the joints and support beams to guarantee they maintain structural integrity. If you find any issues, address them before proceeding; a solid foundation is essential for your project’s success. Don’t overlook the roof and flooring, as these components are critical for durability. By taking the time to evaluate your gazebo now, you’ll secure a safe and enjoyable outdoor space for years to come.
Choosing the Right Transparent Material
When it comes to choosing the right transparent material for your gazebo walls, you have several options to examine. Consider acrylic, polycarbonate, and glass as popular material types. Acrylic is lightweight and affordable, while polycarbonate offers superior impact resistance and insulation. Glass, although heavier, provides a classic look and clarity. Don’t forget to weigh durability factors such as UV resistance and weatherproofing; these will affect longevity and maintenance. Think about your climate and how much transparency you desire. Whatever you choose, make sure it aligns with your vision for freedom, allowing you to enjoy your outdoor space year-round.
Tools and Supplies Needed for the Makeover
To successfully transform your gazebo with transparent walls, you’ll need a handful of essential tools and supplies. Start with your tools checklist, which should include a measuring tape, utility knife, and a drill. You’ll also want safety goggles and gloves for protection. For supplies, stock up on your chosen transparent material, weatherproof adhesive, and screws or fasteners. Don’t forget a level to guarantee everything’s straight and secure. With these essential supplies in hand, you’re ready to release your creativity and enjoy the freedom of an updated gazebo that invites the outdoors in. Let’s get started on this exciting project!
Step-by-Step Guide to Removing Old Walls
Now that you’ve gathered all the necessary tools and supplies, it’s time to tackle the exciting part: removing the old walls of your gazebo. Begin by putting on your safety gear—gloves, goggles, and a mask are essential. Carefully inspect the wall design for any screws or nails; these will need to be removed first. Use a pry bar to gently detach the walls from the frame. Work slowly and methodically, ensuring you don’t damage surrounding structures. Once the old walls are down, check for any necessary repairs before moving on. Freedom awaits with your new vision for the space!
Installing the Transparent Walls
As you immerse yourself in the installation of your transparent walls, it’s important to start by measuring the openings accurately to guarantee a snug fit. Transparent walls offer numerous benefits, like maximizing natural light and providing a clear view of your surroundings. Here are some installation tips to keep in mind:
| Tip | Description |
|---|---|
| Use a level | Verify walls are straight and even |
| Seal edges properly | Prevent drafts and moisture |
| Choose the right material | Opt for durable, UV-resistant options |
| Secure frame well | Confirm stability and longevity |
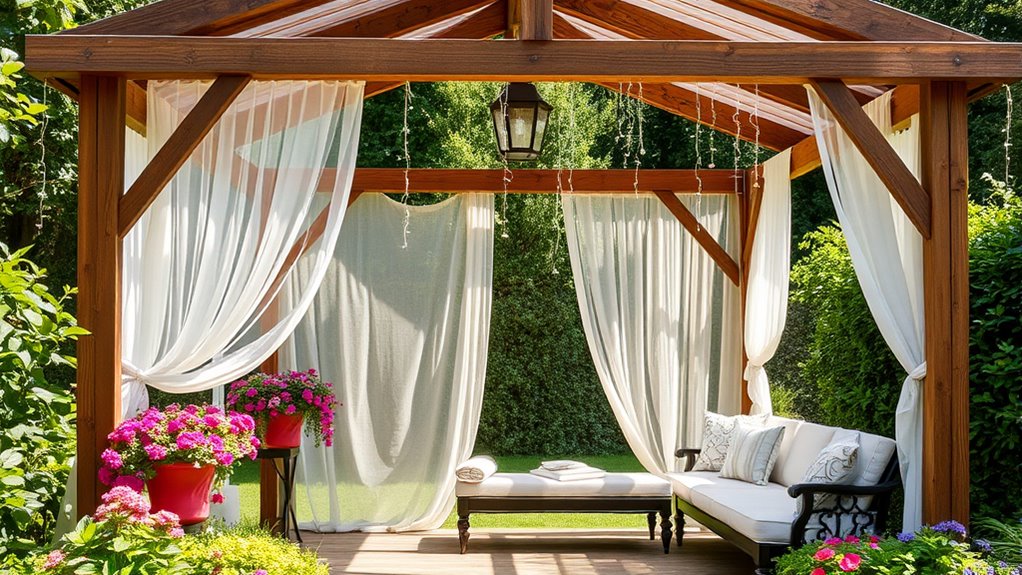
Enhancing the Gazebo With Decor and Lighting
Once the transparent walls are in place, it’s time to elevate your gazebo’s atmosphere with thoughtful decor and lighting. Start by adding decorative accents like colorful cushions, outdoor rugs, and potted plants to create a cozy vibe. Hang string lights or lanterns to provide ambient lighting, making the space inviting for evening gatherings. Consider using solar-powered lights for an eco-friendly touch. You can also incorporate candles for a warm glow that enhances your gazebo’s charm. By mixing and matching these elements, you’ll transform your gazebo into a stylish retreat that reflects your personal taste and allows for endless enjoyment.
Maintenance Tips for Your New Gazebo Walls
To keep your new gazebo walls looking their best, you’ll want to establish a regular cleaning schedule. Don’t forget to inspect for any damage regularly, as catching issues early can save you time and money. Plus, using effective weatherproofing techniques will help protect your investment from the elements.
Regular Cleaning Schedule
Maintaining your new gazebo walls is essential for keeping them looking their best and ensuring their longevity. Establish a regular cleaning schedule to tackle dirt removal effectively. Aim for a cleaning frequency of every 2-4 weeks, depending on your environment. If you’re near trees or have frequent rain, you might need to clean more often. Use a soft cloth or sponge with mild soap and water to avoid scratches. Don’t forget to rinse thoroughly to prevent soap residue. By staying consistent, you’ll enjoy a pristine view and a welcoming atmosphere, allowing you to fully embrace your outdoor space.
Inspect for Damage
As you enjoy your newly transformed gazebo, it’s important to periodically inspect the walls for any signs of damage. Keeping your space safe and inviting is vital, so use this inspection checklist to guide you:
- Cracks or chips in the transparent panels
- Discoloration or fading that might indicate wear
- Loose fittings or hardware that could compromise stability
- Moisture buildup that signals potential leaks
Weatherproofing Techniques
One of the best ways to extend the life of your transparent gazebo walls is by employing effective weatherproofing techniques. By ensuring proper weather resistance, you can enjoy your space year-round. Use these insulation methods to keep your gazebo cozy:
| Insulation Method | Benefits |
|---|---|
| Weather Stripping | Reduces drafts |
| Plastic Sheeting | Adds an extra layer |
| Caulking | Seals gaps and cracks |
| Thermal Curtains | Enhances warmth and privacy |
Incorporating these tips will help protect your gazebo from the elements, allowing you to enjoy your outdoor oasis without worries.
Frequently Asked Questions
Can I Use Recycled Materials for My Transparent Walls?
Absolutely, you can use recycled materials for your transparent walls! They symbolize sustainability, offering eco-friendly options that not only reduce waste but also give you the freedom to create something unique and beautiful.
How Much Does a Transparent Wall Makeover Typically Cost?
A transparent wall makeover can range from $500 to $2,500, depending on materials and size. For budget tips, consider sourcing recycled materials and comparing prices to break down costs effectively while staying within your budget.
Will Weather Affect the Longevity of the Transparent Material?
Yes, weather can affect the longevity of transparent materials. Look for UV protection and moisture resistance. Temperature fluctuations matter too. Regular maintenance tips can help you enjoy your space longer, ensuring your freedom to relax outdoors.
Can I Install Transparent Walls by Myself, or Should I Hire a Professional?
You can definitely tackle the DIY installation yourself if you’re handy, but hiring professional assistance guarantees a polished finish and saves time. Weigh your skills and comfort level before making a decision.
What Design Styles Work Best With a Transparent Wall Gazebo?
For your transparent wall gazebo, consider sleek modern aesthetics that shine or embrace rustic charm with warm wood and greenery. Both styles create a mesmerizing contrast, ensuring your space feels free and inviting, perfect for relaxation.