Building a waterproof gazebo ceiling is like constructing a sturdy ship to brave the storms; every detail matters. Choosing the right materials and planning your design can make the difference between a cozy retreat and a damp disappointment. From measuring dimensions to sealing joints, each step plays an essential role in ensuring longevity and functionality. As you begin this project, consider how vital it is to master the details that keep your gazebo dry and inviting.
Choosing the Right Materials
When you’re planning to build a waterproof gazebo ceiling, selecting the right materials is essential to guarantee durability and functionality. You’ll want to take into account various material types, like aluminum or treated wood, known for their excellent weather resistance. Aluminum offers a lightweight, rust-free option, while treated wood provides a natural aesthetic with added protection against moisture. Additionally, polycarbonate panels can be a fantastic choice, allowing light while sealing out rain. Each option can enhance your gazebo’s longevity, ensuring it withstands the elements, so choose wisely. Your freedom to enjoy outdoor spaces depends on these pivotal decisions.
Measuring and Planning Your Ceiling
To create a waterproof gazebo ceiling that meets your needs, accurate measuring and careful planning are critical steps. Start by gathering essential measuring tools like a tape measure, level, and square. Measure the gazebo’s dimensions, noting height, width, and angle for proper alignment. Next, sketch a planning layout that incorporates your design vision—considering factors like drainage and aesthetics. This blueprint will guide you in selecting materials and determining how they fit together seamlessly. Remember, precision in these early stages guarantees a structurally sound and visually appealing ceiling. Take your time; it’s the foundation of your waterproof sanctuary.
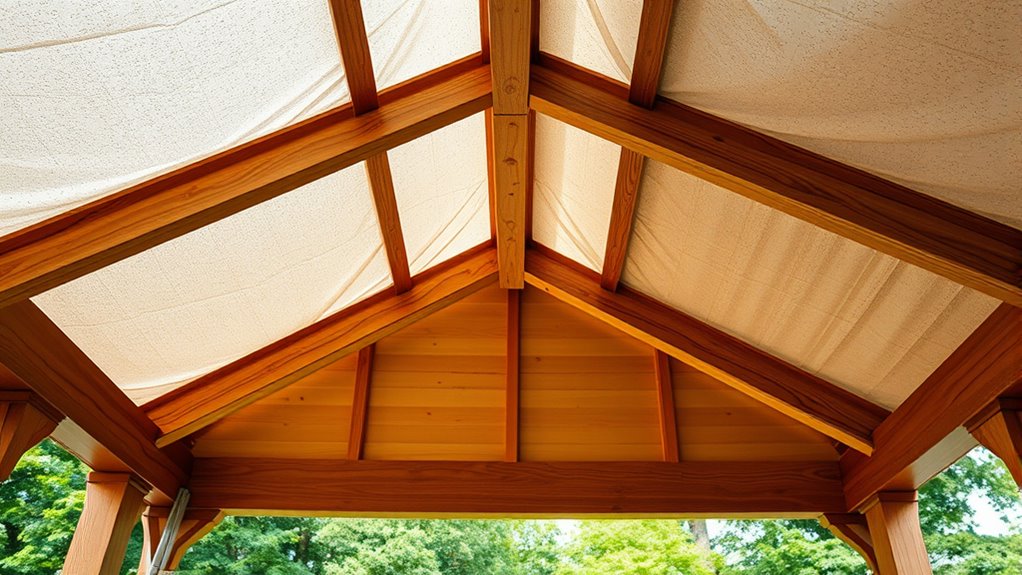
Constructing the Framework
As you begin constructing the framework for your waterproof gazebo ceiling, it’s essential to prioritize stability and durability. Consider using framework types like timber or metal; each offers unique benefits. Make certain your design accommodates load considerations, factoring in potential rain or snow accumulation. For timber, opt for pressure-treated wood to resist moisture. If you choose metal, galvanized steel can withstand the elements. Assemble cross-bracing for added strength, allowing your gazebo to endure harsh conditions while providing a sense of freedom. By carefully selecting materials and constructing a robust framework, you’re laying a solid foundation for your waterproof ceiling.
Installing Waterproof Panels
Waterproof panels are the critical barrier that protects your gazebo from the elements, guaranteeing a comfortable space beneath. When installing these panels, consider various waterproof materials and panel types to achieve the best results. Here’s what you’ll need to know:
- Choose between polycarbonate, PVC, or metal panels for durability.
- Make certain panels fit snugly into the framework, minimizing gaps.
- Use appropriate fasteners that won’t corrode over time.
- Install panels with a slight incline for effective water drainage.
Sealing Joints and Edges
While you’ve successfully installed waterproof panels, the next vital step involves sealing the joints and edges to create a truly impervious barrier. Different joint types, like butt and lap joints, require specific treatments to guarantee water resistance. For butt joints, use a high-quality sealant, applying it generously to fill gaps. With lap joints, consider a waterproof tape for added security. Edge treatments are important too; a robust caulk can prevent moisture from seeping in. Pay attention to detail, as these elements will define your gazebo’s longevity and performance, granting you the freedom to enjoy your outdoor space, rain or shine.
Adding Insulation for Temperature Control
To guarantee your gazebo remains comfortable year-round, adding insulation is essential for effective temperature control. Proper insulation types not only help with temperature regulation but also enhance energy efficiency. Here are some insulation options to contemplate:
- Fiberglass batts: Cost-effective and easy to install.
- Spray foam: Provides superior sealing and insulation.
- Reflective barriers: Reduces heat gain in warmer months.
- Rigid foam boards: Excellent thermal resistance and durability.
Choose the right insulation type based on your climate and personal preferences. This investment will guarantee your gazebo stays cozy, allowing you to enjoy your outdoor space in any season.
Finishing Touches and Maintenance Tips
Now that your waterproof gazebo ceiling is in place, it’s essential to focus on sealing and waterproofing techniques to guarantee longevity. Regular maintenance practices will help you spot potential issues early, saving you time and effort down the line. Plus, knowing how to repair common problems will keep your gazebo looking pristine and functional for years to come.
Sealing and Waterproofing Techniques
As you finalize your waterproof gazebo ceiling, employing effective sealing and waterproofing techniques is essential to ensuring its longevity and durability. Begin by applying high-quality waterproof coatings that repel water while allowing moisture to escape, preventing mold growth. Install moisture barriers to block water penetration effectively.
- Choose a sealant compatible with your roof material.
- Inspect seams and joints regularly for wear.
- Use a brush or spray for even coating application.
- Consider seasonal touch-ups for peak performance.
Regular Maintenance Practices
Even with high-quality sealing and waterproofing techniques in place, regular maintenance practices are key to keeping your gazebo ceiling in top shape. Establish a consistent cleaning routine by gently washing the surface with a mild detergent and water to remove dirt and debris. Don’t forget to inspect for any signs of wear or damage during seasonal inspections—this proactive approach helps you catch potential issues early. Pay attention to the seams and joints where moisture can accumulate. By maintaining this diligence, you’ll guarantee your gazebo ceiling remains a beautiful and functional part of your outdoor oasis, giving you the freedom to enjoy it worry-free.
Repairing Common Issues
While it’s great to have a well-built waterproof gazebo ceiling, issues can occasionally arise that require your attention. Addressing ceiling leaks promptly is essential for mold prevention and maintaining your gazebo’s integrity. Here are some common issues to watch for:
- Inspect seams and joints regularly for damage.
- Caulk any gaps or cracks to prevent water intrusion.
- Confirm proper drainage to avoid pooling water.
- Clean and treat surfaces with mold-resistant solutions.
Frequently Asked Questions
How Much Does It Cost to Build a Waterproof Gazebo Ceiling?
Building a waterproof gazebo ceiling typically costs between $1,500 and $5,000. This includes material costs, like waterproof membranes and wood, plus labor expenses. Consider your design and location for accurate budgeting and freedom in choices.
Can I Convert an Existing Gazebo Ceiling to Be Waterproof?
Transform your gazebo ceiling into an impermeable fortress using high-quality gazebo materials and advanced waterproof coatings. It’s like turning a simple roof into a rainproof paradise—freedom from leaks awaits you! Get started today!
What Tools Do I Need for Building a Waterproof Gazebo Ceiling?
You’ll need a saw, drill, measuring tape, waterproof sealant, and roofing materials for your waterproof gazebo ceiling. Proper tools selection and installation techniques guarantee durability, letting you enjoy your outdoor space without worry.
How Long Does It Take to Complete the Project?
If you’re aiming for a durable gazebo ceiling, expect a project timeline of 2-3 days. Time estimation depends on your experience and materials; a friend took 48 hours, ensuring quality and lasting functionality while enjoying the project.
Are There Any Specific Permits Required for Construction?
Yes, you may need permits based on construction regulations and local ordinances. It’s essential you check with your municipality to guarantee compliance, as obtaining the right permits can prevent future issues and enhance your project’s success.