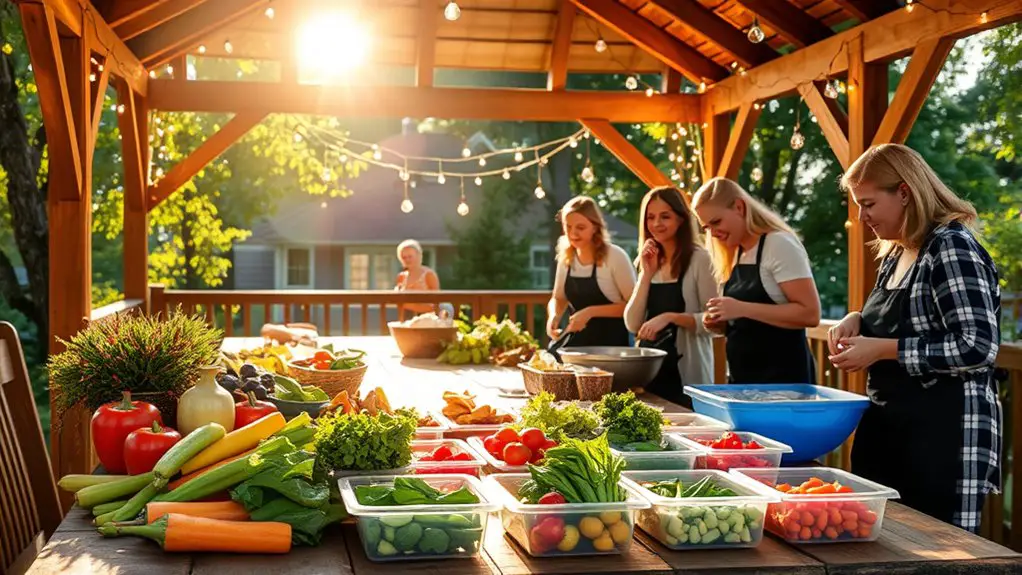
To organize a simple meal prep class in your gazebo, start by choosing a diverse menu that includes vegetarian and gluten-free options. Set up comfortable seating with good visibility for demonstrations, and make certain you’re prepared for any weather changes. Gather all necessary supplies and ingredients while considering participants’ dietary preferences. Engage attendees with interactive activities and encourage feedback. Following up with thank-you emails and surveys can strengthen community ties. There’s more to enhance your class experience.
Choosing the Right Menu
When it comes to choosing the right menu for your meal prep class, how do you guarantee it resonates with everyone? Start by embracing menu variety. Offer a mix of recipes that cater to different tastes and dietary considerations. Think about including vegetarian, gluten-free, and low-carb options to make certain everyone feels included. You want participants to feel empowered and excited about their food choices, so provide flexibility within your menu. Encourage them to customize dishes with their favorite ingredients, adding a personal touch. Finally, consider seasonal and local produce to keep things fresh and vibrant. By thoughtfully curating your menu, you’ll foster a welcoming atmosphere that celebrates everyone’s preferences, making your meal prep class a delightful experience for all.
Preparing Your Gazebo for the Class
After selecting a diverse menu that caters to various dietary preferences, it’s time to focus on the setting where your meal prep class will take place. Start by arranging comfortable seating that encourages interaction and engagement. Think about a layout that allows everyone to see the demonstration while having enough space to move around.
Next, consider the weather. If it’s sunny, provide shade with umbrellas or canopies; if rain’s a possibility, have a backup plan to keep everyone dry. Guarantee your gazebo is clean and inviting, creating a warm atmosphere. Adding decorative touches, like fresh flowers or tablecloths, can enhance the experience. Additionally, setting up a gazebo with netting can help prevent pests and create a more enjoyable environment. With these preparations, you’ll set the stage for a fun and productive meal prep class.
Gathering Necessary Supplies and Ingredients
As you prepare for your meal prep class, gathering the necessary supplies and ingredients is vital to guarantee a smooth and enjoyable experience. Start by creating a grocery checklist that outlines all the ingredients you’ll need for your recipes. This step not only keeps you organized but also assures you won’t forget anything essential. When it comes to ingredient sourcing, consider local markets or grocery stores that offer fresh produce and high-quality items. Don’t hesitate to reach out to participants beforehand to see if they have any dietary preferences or restrictions; this can help tailor your ingredient selection. With everything in place, you’ll create a welcoming environment where everyone can enjoy the freedom of preparing delicious meals together.
Engaging Your Participants
How can you guarantee your participants feel engaged and excited during the meal prep class? Start by incorporating interactive activities that invite everyone to jump in and share their ideas. Think about fun cooking challenges or group discussions that encourage creativity. By allowing participants to collaborate, you create a vibrant atmosphere where everyone feels included.
Don’t forget to ask for participant feedback throughout the class. This not only shows you value their opinions but also helps you adjust activities on the fly to keep everyone interested. Encourage questions and discussions to spark conversations. Ultimately, when your participants feel like active contributors, they’ll leave your meal prep class not just informed, but truly inspired.
Tips for a Successful Follow-Up
To guarantee your meal prep class leaves a lasting impact, following up with participants is essential. Start by sending a thank-you email to express your appreciation. In that message, invite participant feedback—ask what they loved and what could be improved. This not only shows you care but also helps you refine future classes. Consider creating a short survey to gather insights efficiently. Sharing some of their feedback publicly can build community and trust. If participants enjoyed the class, encourage them to join future ones by offering a sneak peek of what’s next. By maintaining this connection, you’ll foster an engaged group enthusiastic to learn more about meal prep, making your classes even more successful in the long run.
Frequently Asked Questions
How Long Should the Meal Prep Class Last?
The class duration should ideally be 1.5 to 2 hours. This timeframe balances participant engagement and hands-on activities, allowing you to share valuable tips while keeping everyone interested and ready to learn.
What Is the Ideal Number of Participants?
Imagine a cozy gathering of eight friends, chopping veggies together. For ideal participant engagement and positive group dynamics, aim for six to ten attendees. This guarantees everyone feels involved without overwhelming the atmosphere.
Do I Need a Permit for Using My Gazebo?
You might need a permit for gazebo usage, depending on local regulations. It’s best to check with your city or county’s guidelines to make certain you’re complying with any permit requirements before planning your event.
What Should I Do in Case of Bad Weather?
If it’s a rainy day, it’s smart to have a backup location ready. You could consider moving indoors or to a friend’s place, ensuring everyone stays comfortable and enjoys the meal prep experience without hassle.
Can I Charge Participants a Fee for the Class?
Yes, you can charge a fee for your class. Just consider pricing strategies that align with participant expectations. Offering value and a unique experience can enhance satisfaction and encourage more people to join.