Hosting a jewelry-making class in your gazebo can be a delightful experience. Start by picking a sunny day, avoiding holidays for better attendance. Clean your gazebo and set up a comfortable workstation with proper lighting. Choose vibrant materials that inspire creativity. Promote your class through social media and local businesses to attract participants. Wrap up with a mini fashion show to celebrate everyone’s creations. Discover more tips to guarantee your class is memorable and engaging.
Choosing the Right Date and Time
When’s the best time to host your jewelry-making class in the gazebo? To find the perfect date, consider weather considerations first. A sunny afternoon in spring or early fall is ideal, as it encourages creativity and comfort. You wouldn’t want rain or extreme heat to dampen your gathering. Next, think about guest availability. Check calendars to avoid holidays or busy weekends that might conflict with your friends’ plans. Poll your guests on their preferred days, creating a sense of inclusion. By aligning the weather with your guests’ schedules, you’ll foster an inviting atmosphere for your class. Ultimately, a well-timed event not only enhances enjoyment but also nurtures that free-spirited vibe we all crave when crafting beautiful jewelry together. Additionally, ensure that your gazebo is made from durable materials to withstand changing weather conditions throughout the year.
Preparing Your Gazebo Space
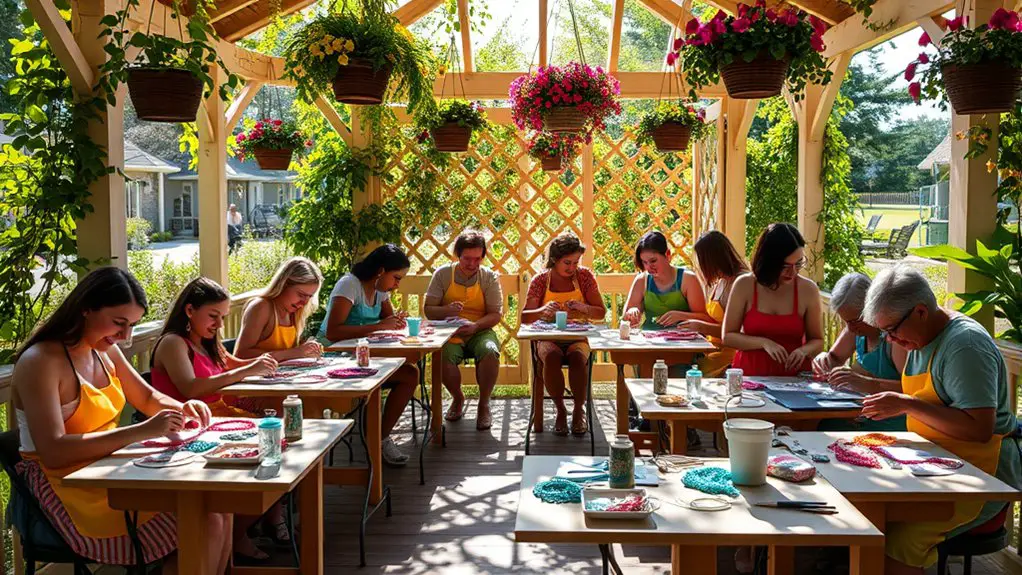
To create an inviting atmosphere for your jewelry-making class, start by cleaning and organizing your gazebo space. Make certain that all surfaces are tidy and free from clutter, allowing for easy access to your supplies. Additionally, consider adding adequate lighting to enhance visibility and set the perfect mood for creativity. Regular maintenance is essential for optimal functioning of your gazebo, ensuring it remains a beautiful and safe environment for your class.
Clean and Organize Space
Before diving into the creative world of jewelry-making, it’s essential to make sure your gazebo is clean and organized. Start by gathering your cleaning supplies—mop, dust cloths, and disinfectant. Clear out any clutter that might distract you and your participants.
Next, utilize organizational tips to create a functional workspace. Designate areas for materials, tools, and finished pieces. Consider using storage bins or trays to keep beads, wires, and tools sorted. Label everything to streamline your process and enhance creativity.
You want everyone to feel inspired, so make certain the space is inviting and free from chaos. A well-organized gazebo allows you the freedom to focus on your craft, making the jewelry-making experience enjoyable for all.
Provide Adequate Lighting
Although your gazebo may be a charming setting, without adequate lighting, it can quickly become a challenge to create beautiful jewelry. To enhance your space, consider incorporating both ambient and task lighting. Ambient lighting sets the mood, while task lighting focuses on your work area, ensuring you can see every detail as you craft.
| Lighting Type | Purpose |
|---|---|
| Ambient Lighting | Creates a warm, inviting atmosphere |
| Task Lighting | Provides direct light for detailed work |
| String Lights | Adds a whimsical touch while illuminating the space |
| Desk Lamps | Perfect for focused, close-up tasks |
With the right lighting, your jewelry-making class can be both functional and enchanting, allowing your creativity to shine.
Selecting Jewelry-Making Materials
When you’re ready to plunge into jewelry-making, carefully selecting your materials is essential for both the aesthetic and durability of your pieces. Start with bead selection; consider colors, shapes, and sizes that resonate with your creative vision. Glass beads offer brilliance, while wooden beads provide a rustic touch. Next, think about metal types for your findings and chains. Sterling silver is classic and durable, while copper adds a warm, earthy feel. Don’t forget to mix materials for unique designs—pairing vibrant beads with sleek metal can create striking contrasts. Always verify that your materials are safe to use, especially if your participants include beginners. With the right selections, you’ll empower everyone to express their individuality through beautiful jewelry.
Promoting Your Class
How can you effectively spread the word about your jewelry-making class? Start by harnessing the power of social media. Create eye-catching posts showcasing your beautiful creations and the unique experience participants will have. Use platforms like Instagram and Facebook to engage with potential students, sharing behind-the-scenes glimpses of your class setup and testimonials from past attendees.
Don’t underestimate local advertising, either! Put up flyers in local craft stores, coffee shops, and community centers. Consider collaborating with nearby businesses to cross-promote your class. Word-of-mouth is invaluable, so encourage friends and family to share your event. With a blend of social media buzz and local outreach, you’ll create an irresistible allure around your jewelry-making class, inviting all those seeking creative freedom to join you!
Setting Up a Comfortable Workstation
After generating excitement around your jewelry-making class, it’s time to focus on creating an inviting and functional workstation. Begin with a thoughtful workstation layout that allows easy access to tools and materials. Arrange tables in a U-shape to foster interaction, ensuring everyone can see each other and share ideas.
Next, prioritize comfortable seating. Opt for sturdy chairs with good back support, allowing participants to work for extended periods without discomfort. Consider adding cushions for extra comfort. Additionally, make sure to set up your gazebo in a flat, level area to ensure a stable and enjoyable environment for crafting.
Lastly, provide adequate lighting to enhance focus and detail in your creations. By designing a workspace that combines functionality with comfort, you’ll inspire creativity and encourage your students to express themselves freely through their jewelry-making journey.
Demonstrating Techniques and Providing Guidance
Engaging your students through clear demonstrations is key to their success in jewelry-making. Start by showcasing essential techniques to spark their creativity and confidence. Here are three effective ways to provide guidance:
- Technique Demonstration: Show each step slowly, explaining the tools and materials you’re using. Visual learners appreciate seeing the process in action.
- Guidance Tips: Offer practical advice, like how to choose colors that complement each other or the importance of measuring wire accurately.
- Encourage Questions: Foster an open environment where students feel comfortable asking for clarification or sharing their thoughts.
Encouraging Creativity and Individual Expression
Creativity thrives in an environment that nurtures individual expression, and as an instructor, you can play a pivotal role in fostering this atmosphere. Encourage your students to embrace their unique creative expression by providing a variety of materials and techniques. Let them explore colors, textures, and shapes that resonate with their personal style. Instead of enforcing strict guidelines, invite them to experiment and make choices that reflect who they are. Create a space where questions and ideas flow freely, allowing each participant to share their vision. Celebrate the differences in designs, reinforcing that every piece is a true reflection of individuality. By doing this, you’ll inspire confidence and ignite a passion for jewelry-making that honors their personal journey.
Wrapping Up and Celebrating Creations
As you gather your stunning creations, it’s time to showcase your finished jewelry and admire everyone’s unique designs. Capture the moment with a group photo that highlights your collective achievements, celebrating the creativity that flourished during the class. Let’s take a moment to acknowledge each individual’s hard work and the beautiful pieces you’ve all crafted together.
Showcase Finished Jewelry
The final moments of your jewelry-making class are a time for celebration and reflection on the unique pieces you’ve created. It’s the perfect opportunity to showcase your techniques and display inspirations that fueled your creativity. Gather everyone around to admire each other’s work, fostering a sense of community and pride.
Here are three ideas to wrap up the session:
- Mini Fashion Show: Each participant can model their jewelry, sharing the story behind their creation.
- Creative Display: Set up a designated area to showcase all finished pieces, allowing everyone to appreciate the variety.
- Feedback Circle: Encourage participants to share what they loved about each piece, enhancing the experience with positive reinforcement.
Celebrate your artistry and the connections made!
Group Photo Opportunity
Capturing the moment with a group photo is a fantastic way to commemorate your jewelry-making class and the friendships formed along the way. To highlight the vibrant group dynamics, consider a few playful photo themes. You might choose a colorful backdrop in your gazebo, showcasing your creations, or arrange everyone in a lively circle, each holding their favorite piece. Encourage participants to express their personalities—perhaps a fun pose or a silly gesture that reflects the joy of the experience. Don’t forget to share these photos with everyone afterward; it strengthens connections and celebrates your collective creativity. These snapshots will serve as lasting memories, reminding you all of the fun and freedom you experienced while crafting together.
Celebrate Individual Achievements
Celebration is an essential part of any creative journey, and wrapping up your jewelry-making class is the perfect opportunity to honor each participant’s unique achievements. Taking a moment for individual recognition not only boosts confidence but also fosters a sense of community. Here are three ways to celebrate personal milestones:
- Showcase Creations: Set up a display area where everyone can exhibit their finished pieces, creating a gallery of creativity.
- Certificates of Achievement: Hand out personalized certificates that highlight each participant’s journey—these tokens serve as lasting reminders of their efforts.
- Share Stories: Encourage participants to share their experiences and favorite moments from the class, reinforcing connections and celebrating growth together.
Frequently Asked Questions
What Is the Ideal Number of Participants for the Class?
The ideal number of participants balances engagement and group dynamics. You’ll want enough people for diverse ideas, but not so many that individual voices get lost. Aim for 5 to 10 participants for ideal interaction.
How Do I Handle Cancellations or No-Shows?
To handle cancellations or no-shows, establish a clear refund policy. Consider waitlist options for last-minute participants, allowing flexibility and ensuring everyone gets a chance to join, while maintaining a fun, stress-free environment.
Can I Charge a Fee for the Class?
Sure, you can charge a fee for the class! Think of it as setting the stage for creativity. Consider pricing strategies that cover class materials while ensuring participants feel they’re getting great value for their experience.
What Age Group Is Suitable for Jewelry-Making Classes?
For jewelry-making classes, consider offering child-friendly techniques for younger participants while incorporating adult skill-building sessions. This way, everyone can enjoy the creative process, expressing themselves and discovering their artistic potential in a welcoming environment.
Are There Any Necessary Permits for Hosting Events in My Gazebo?
Before you let your creativity bloom under that gazebo, check local regulations to guarantee you’re compliant. Don’t forget about event insurance, either; it’s like an umbrella shielding you from unexpected storms!